
Beastmoon Strategy
To Win a Beastmoon Game it’s essential to have a Great Strategie in the Team. The most important thing would be Communication. At the beginning of each Hunt run to a nearby circle and capture it. (Mostly people refer to capturing by saying „cap“ or „capping). A good alternative would be to collect pips. Try to avoid going into battles without any Pips since it will be a huge disadvantage. Before going into Battle it may be better for teammates to arrive so they can support you in Battle. Checking the Map for the Position of your Teammates will help you decide when it’s a good time to start a Fight. Depending on the Situation it could be better to defend Battle Rings instead of Capturing new ones. Furthermore only risk a Spiral Battle when everyone is ready to join and if it’s necessary. Recovering from a loss in a Spiral Fight can prove quite difficult. In the End just have a fun time with your Teammates and enjoy the Game.
Beastmoon Hunt Tips
The Beastmoon Hunt becomes available the first Tuesday of each month for 7 days.
How To Earn Points In Beastmoon Hunt
The objective in the Beastmoon arena is to score Points which are all earned in the battle circle where you battle other enemies. At the beginning of each match four initial battle rings will be available in each corner of the Hunting Grounds. Wizards who capture these battle rings by standing inside of them. Battle rings that no one else is standing in take 10 seconds for one Wizard to capture, while enemy controlled battle rings take 30 seconds to capture. The required time to capture a battle ring will be cut in half for every other teammate inside of the ring. Capturing a Battle Ring by standing in it will earn your team 1 Point. If at least one member from both teams is standing inside of a Battle Ring then a start will start. Teams will earn 2 Points for every Wizard that is defeated in battle and added to their goal of hitting 100 points to win the Beastmoon hunt. Battle Rings that are won through duels will give the winning team 5 Points. After one team hits 50 points or the halfway point of the hunt, a fifth battle circle called the Spiral battle circle will become available in the middle of the Hunting Grounds. If you win the Spiral battle circle from the enemies it grants your team 15 points. Your end goal of the Beastmoon hunt is to reach 100 points before the other team does, best of luck!!
Point System and Points From Capturing Battle Rings
First off the basics, capturing a battle ring by standing in it will earn your team 1 Point. If at least one member from both teams is standing inside of a battle ring a battle will immediately start. Teams will earn 2 Points for every Wizard that is defeated in the battle circle that will be applied to the team's total at the end of the battle, but if you win a battle in star, moon, sun or eye circles it gives you 10 points. The spiral circle in the center of the battle arena gives 20 points if you defeat the enemy team for it! When you or an opponent gets defeated, the opponent returns to their base and receives a 30 second penalty before they can use the teleporter and return to the battle arena. If you do end up getting defeated by an opponent don’t flee right away, because if your teammate wins a battle within 2 rounds of your defeat, you are revived at 1 hp and the opponent gains no points for your defeat.
Manage Your Pips And Health
Before you start a fight always look at your pips and health. Every Beastform has a set amount of health and some Beastforms can come with extra pips right at the start of the battle. To give yourself the best chance at winning fights it is best to have full health and max bonus pips if you can. There are pips all around the map that you can fill up on health from wisps in each corner or at your base. Sometimes you will have to join a fight without being well prepared, my suggestion if you have the chance to gather pips and health before entering a battle take that opportunity.
School Advantages
The Beastmoon Hunt uses its own school advantage chart. That you can find while you’re in the Beastmoon hunt on the top left of your screen. The school advantages are the following:
Balance has no advantages or disadvantages
Storm has a +25 damage advantage over Fire
Ice has a +25 damage advantage over Storm
Myth has a +25 damage advantage over Death
Fire has a +25 damage advantage over Ice
Life has a +25 damage advantage over Myth
Death has a +25 damage advantage over Life
Beastmoon Map Guide
Each Beastmoon map is very different with the placement of pips, placement of Battle Chests and even Hiding Spots.
Below is a short summary of each map, followed by a post for each Hunting Ground.
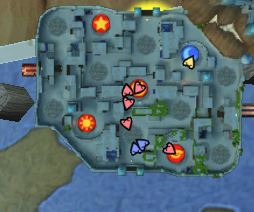
Mirage Map
If you look at the picture below there are teleporters on the far right and left of the minimap. The teleporter to the blue base is on the far right of the minimap, while the teleporter to the red base is on the far left. This Arena also spawns the largest amount of pips throughout the entire map.
Avalon Map
If you look at the picture below there is a teleporter on the top and bottom of the minimap. Players cannot enter the opposing team’s base, only their own. The teleporter to the red base is on the top of the map and the teleporter to the blue base is on the bottom. This Arena also spawns victory pips each time you win a battle. Victory pips are pips that appear after you have successfully won a battle for full control of the circle. Victory pips are spawned from all 4 circles except spiral.

Aquilla Map
If you look at the picture below there is a teleporter at the lower right hand corner and the upper left hand corner of the map that will lead you to the base. This Arena also spawns defeat pips under certain conditions inside your home base when you are defeated in battle. This allows you to get some pips before you go on the battlefield and have a chance at making your comeback.

Celestia Map
If you look at the picture on the top center and bottom center of your map there are teleporters to your base. The blue base teleporter is at the upper center of the map while the red base teleporter is at the bottom center. This Arena supports many different mechanics from the other Arenas. Some health wisps will spawn pip wisps instead at times. Running in and out of certain combat circles will give you the speed boost, one that is not contested by an enemy.

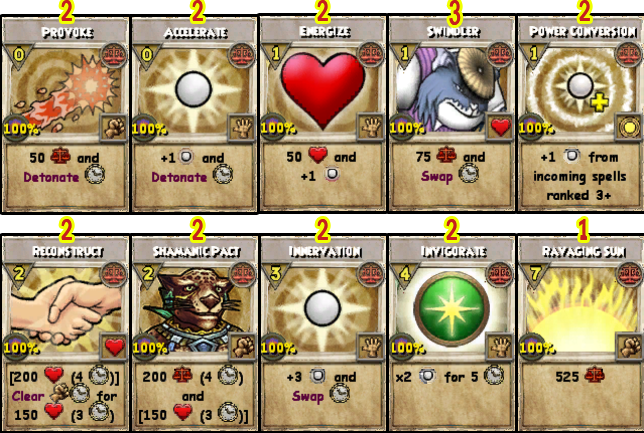
Storm Wolf Warrior
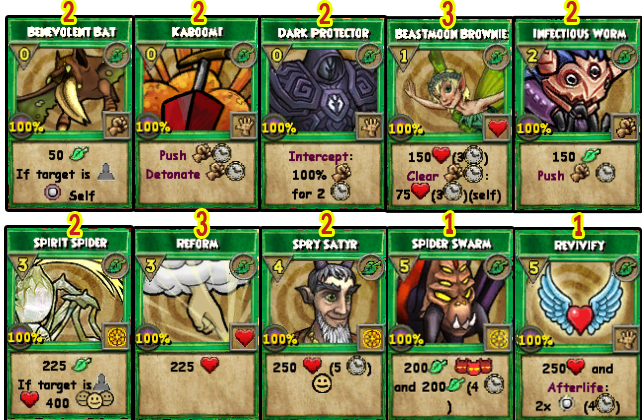
The Storm Wolf Warrior named Varg Thundergrowl has 500 health, a normal speed and a bonus pip limit of 1. This form is very offensive but also has the ability to blade themselves and teammates very effectively. The warrior can also stun opponents very easily. The weakness of this form is it’s Aoe hits. The Aoe hits include a weak 3-pip spell, a decent 6-pip spell and a good 4-pip spell which unlocks at level 5. The Advantage of this form lies in removing DoT spells, to benefit from HoT spells and to be one of the best 1v1 forms.
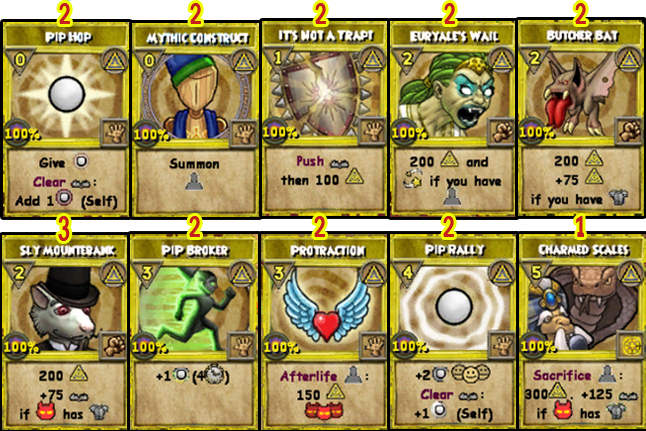
All level 1 spells shown below.
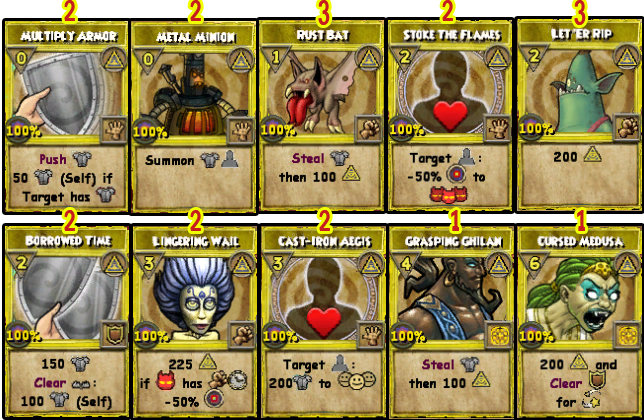
Balance Wolf Warrior
The Balance Wolf Warrior with the name Tyr Honor-Claw comes with a solid 575 health base, normal speed and a bonus pip limit of 1. This form is mainly a Supporter. It has the ability to blade themselves and others as well as trapping opponents and stealing blades. It may also donate pips to other teammates. However this form has only limited access to Aoe. One 5-pip AoE spell adds mainly traps while the other 4-pip AoE spell has to be unlocked at level 4. Altogether this Form is a great supporter for other forms and can make a huge difference in battle.
All level 1 spells shown below.

Myth Rat Thief
The Myth Rat Thief named Archibald Ratfink has 325 health, an additional 10% speed and a bonus pip limit of 2. The Rat is one of the most offensive Beastmoon forms. The additional speed can be quite useful as well. The Strengths are to remove blades, push traps and deal outstanding damage. Furthermore it can also summon a minion for 0 pips to aid them in battle. There is a 5-pip AoE spell as well as a 4-pip AoE spell which is unlocked at level 3. A potential Weakness is the low health except that it’s still a recommendable beastmoon form.
All level 1 spells shown below.
Storm Rat Thief
The Storm Rat Thief named Crackles Sparkwhisker comes with 300 health, an additional 10% speed and a bonus pip limit of 1. It’s advantages are stunning and debuffing the opponents as well as using strong hits which can become even stronger by fulfilling special conditions of the spells. The form has a 5-pip Aoe spell and a 4-pip AoE spell which is unlocked at level 5. A Important Aspect is the unique Universal dispel spell of this form. The greatest Weakness is having the lowest health out of all beastmoon forms. Either way this form is a great choice for offensive players.
All level 1 spells shown below.

Life Draconian
The Life Draconian also names Varrax Greentalon, he comes with 450 health, comes with a 0% speed boost and has a bonus pip limit of 2. The Life Draconian main advantage is that he has a single target heal that can revive allies and several heal over time and a guardian spirit like spell only downfall is this form often finds itself as the first target. This form does suffer offensively with only 4 damage spells and it’s only AoE hitting spell is at level 5. An important aspect of this form is its ability to push DoT spells back to enemies.
All level 1 spells shown below.
Myth Draconian
The Myth Draconian named Saryx Legendwing comes with 475 health, no additional speed boost and has a bonus pip limit of 1. He can generate pips by both using his minion and using his own spells While his minion is useful for generating pips, it is also on the weaker side so be careful when relying on it too much.. His specialty is working with traps though, with the unique ability to clear traps to gain pips, or create them when his targets have shields.
All level 1 spells shown below.
Fire Elf
The Fire Elf named Kellic Cinderbow comes with 325 health, an additional 20% speed and a bonus pip limit of 2. Fire Elf likes to deal damage with damage over time spells. As I said before the downside is that it only has 325 making the Fire Elf easier to kill than some of the other Beastforms. Fire Elf learns a 5 pip attack area of effect spell at Beastform level 1. Fire elf is also a team-player as it can damage itself for 250 damage and give 3 pips to all allies which can turn the tide in the fight into your favor.
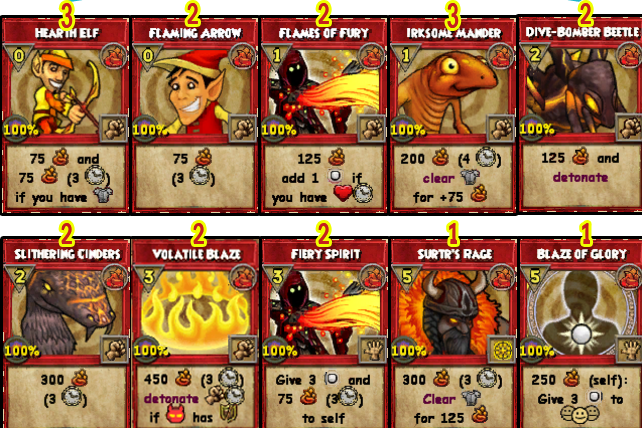
All level 1 spells shown below.
Ice Elf
Ice Elf named Arbenbrand Frostarrow is a 400 health beastmoon that has an additional 20% speed boost like its counterpart Fire Elf. Ice Elf also can collect 3 combat pips which is the highest amount. The way Ice-Elf fights is different from its counterpart as it is mostly based on charms, positive and negative as well as leaving traps afterwards to boost the next spell. Ice Elf shields allies as well as giving allies pips at the same time. Ice Elf is a good choice if you like to play Fire Elf but don't want to be as a glass cannon compared to it.
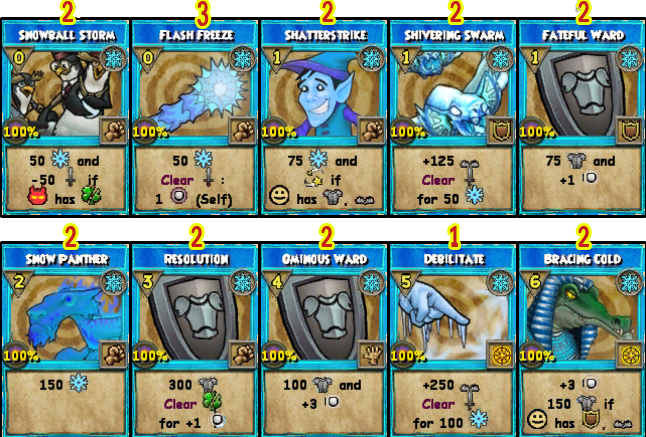
All level 1 spells shown below.
Ice Colossus
The Ice Colossus named Frostcrag comes with 600 health, Ice Colossus comes with no speed boosts and 25% incoming boost to fire, along with no speed boost. Bonus pip limit of 0. The Ice Colossus form can work pretty good with any other Beastform in battle. The higher level you have it the more troublesome it can be to the enemy team. One downside to being such an offensive form is that it could be the first one taken out along with the healer or tank. It has amazing defensive spells, having a lot of shields to choose from and the strongest area of effect shield. This Beastform does have a few powerful spells however he is mostly just a tank used for his health and shields.
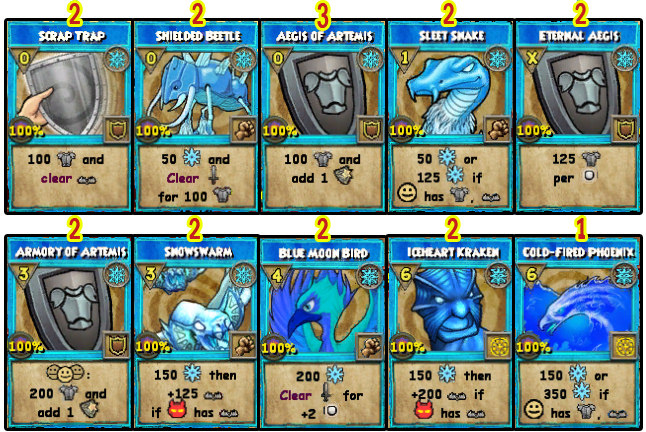
All level 1 spells shown below.
Life Colossus
The Life Colossus named GrainteHeart is a tank/jade beastmoon. Like its counterpart the Ice Colossus, it has a nice amount of hp coming with 550. GrainteHeart moves at normal speed and can’t collect pips. GrainteHearrt is a healer and can remove DoTs, move DoTs from self to target as well as detonate dots. GrainteHeart has a unique spell where he can use a sentinel based spell and intercept all damage taken to allies for 2 rounds, risky but it can turn the tide saving your low health allies.GrainteHeart has a wide variety of healing spells to use to help you and/your allies. Overall GrainteHeart is a great choice for people who love to Jade/Tank as well as to support your allies.
All levels 1 spells shown below.
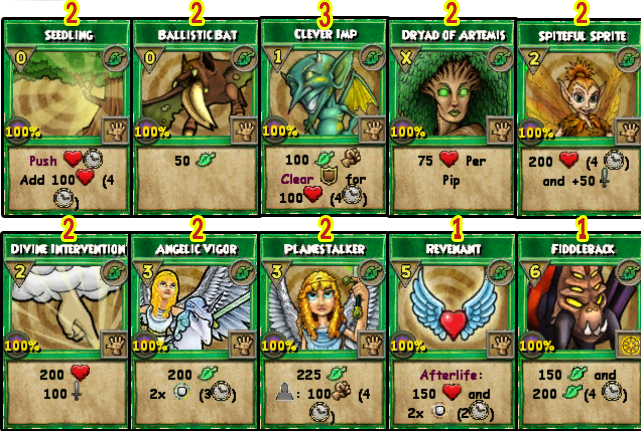
Myth Minotaur
The Myth Minotaur named Asterion Lorehornarg is a Beastmoon that comes with 425 health. It also comes with normal speed and can collect one pip out of combat. The way this beastmoon fights is more defensively then offensive as the spells he uses focuses more on shields as it can be giving shields/removing shields or taking shields. Asterion can also leave negative accuracy charms onto the target that he chooses. One of Asterion's best spells is called Cursed Medusa, it's an aoe spell that costs 6 pips dealing 200 damage, it removes a shield from the enemy then stunning them afterwards. Asterion also comes with a minion but it is a defensive minion like himself.
All level 1 spells shown below.
Fire Minotaur
The Fire Minotaur named Bevo Emberhoof is kind of a buffed up fire elf. This form has high damaging spells that also put debuffs on the target that the player uses them on, instead of devastating dots. This form has no speed boost, it has 425 health, and an incoming boost of 25% to storm. This form also has the ability to start off with 2 extra pips. This is the only beastform with direct accuracy debuffs. This form excels at stalling the enemy team as well as dealing damage to them. Alongside all the debuffs and damage this form has a newly buffed 4 pip AoE. This form can be quite troublesome if it is not dealt with early on in the fight. The biggest advantage with this form are the debuffs that happen after the damage is dealt. One downside is that just like any other offensive form it may be taken out very quickly.
All level 1 spells shown below.

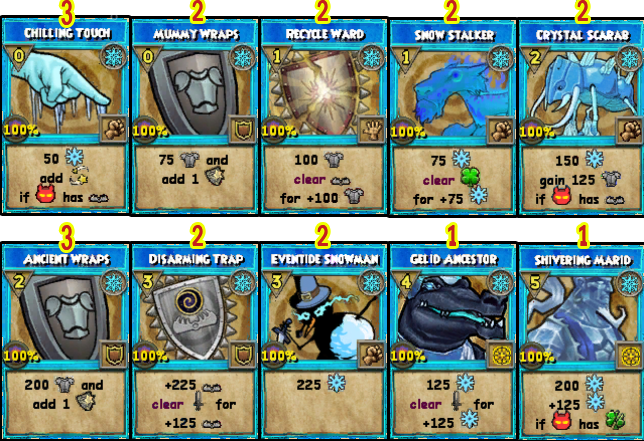
Storm Krokomummy
The Storm Krokomummy named Sutekh Thunderscales is an offensive beastmoon form that has 400 health and can gain 1 extra pip through a wisp on the battlefield. This form has a 25% incoming boost to ice, as well as no speed boost. This is an offensive form that has many different attacks 4 of which have additional effects if your health is less than 50%. 1 of the more unique spells is called Energetic Golem which does 200 storm damage and gives you 2 pips if your health is 50% or less. This form also has a spell called Serpent's Twist which does 200 damage and stuns the target if the cast is at 50% or less health. The Storm Krokomummy can work very well with any other form in battle, one downside is that because of its low health it can easily be taken out with 2 hits from the enemy team.
All level 1 spells shown below.

Ice Krokomummy
The ice Krokomummy named Shalku FrostBite is more of a tanky school which has a huge amount of health at 500, bonus pip limit of 2, and normal speed. This form is focused on armor, and dealing damage to removing 1 charm and dealing damage again.
All level 1 spells shown below.
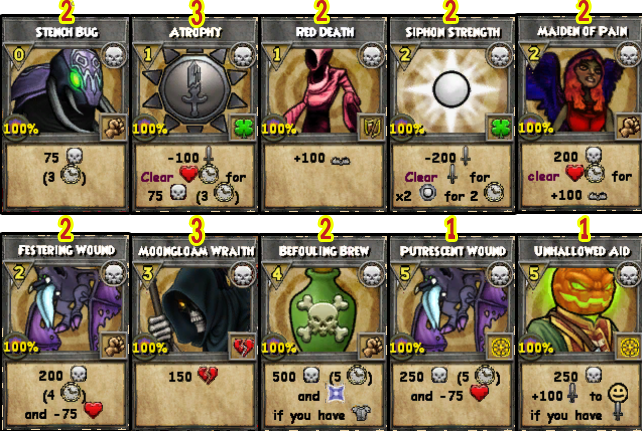
Death Fairy
The Death Fairy named Mortica DoomSprinkle comes with a low end of 350 hp, Bonus pip limit of 2, and a balanced speed of 20. This form is an offensive hitter with amazing damage to take out tanky forms.
All level 1 spells shown below.

Life Fairy
The Life Fairy named Alia GreenThorn has an hp of 350, with a bonus pip limit of 2 and speed limit 20%. She is mainly focused on healing overtime and can be pretty offensive at times.
All level 1 spells shown below.
Balance Fairy
The Balance Fairy named Sandy Glimmer Wing has an hp of 375, an amazing bonus pip limit of 3, and 20% speed. This form is focused on donating and gaining a lot of pips and has some really good overtime hits.
All level 1 spells shown below.
Death Ninja pig
The Death Ninja pig named Ghost Pig comes with 450 health, a 10% speed boost, and can gain 2 extra starting pips. This form also has a 25% incoming boost to myth. The main use of this form is for all of the debuffs that it can put on the enemy team. While this form struggles to take out multiple enemies at low levels, at level 5 this form gains a strong AoE that has relatively easy conditions that will have it buff your team. This form is very useful to have on any team, even though it may seem weak at first those debuffs do add up and can cause the enemy team a lot of trouble. One of the biggest downsides to this form is that it does not do very well against multiple enemies on its own at lower levels.
All level 1 spells shown below.
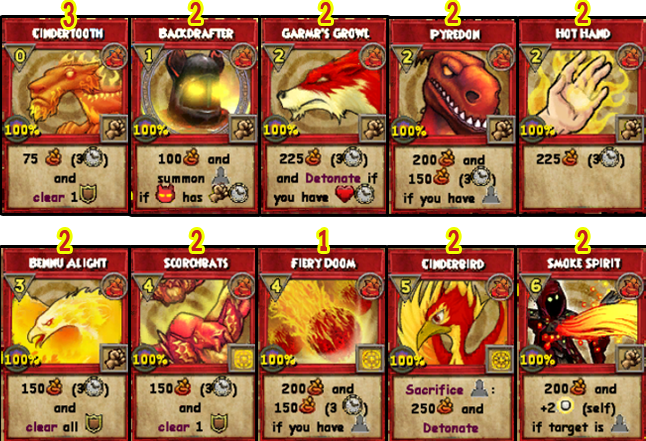
Fire Ninja pigs
The Fire Ninja Pig named Kaji Buta has 425 health, a speed boost of 10% and a bonus pip limit of 1. form combines the raw damage that other fire forms have with the versatility of a myth form. He also has spells that require a Minion play, expect to see him teaming up with Myth Beastforms.
All level 1 spells shown below.
Balance Cyclops
The Balance Cyclops namesJusticeBringer Legathon comes with 575 health, a low end bonus pip limit of 0, and normal speed. This Beastform is perfect for support, stunning and removing shields, it is an all rounder which is amazing.
All level 1 spells shown below.

Death Cyclops
The Death Cyclops is a more tanky form that has 550 health and can pick up one extra combat pip. He comes with the ability to steal overtime heals and place heal debuffs. He can also place drain spells and damage over time spells on enemies. He can also place damage debuffs and traps on enemies, making him a perfect teammate for your hunts.
All level 1 spells shown below.

Beastmoon Crafted Gear
One of the most beloved features of the Beastmoon Event is the gear. Currently there are only robes available. While the Gear itself doesn’t have any Stat Boost it simply looks amazing. Also it can only be obtained from the Beastmoon Event. Each school has a total of 4 Craftable Robes. Each Tier has more detailed Look than the previous Robe. Since it’s a popular Stitch in Game it’s definitely worth taking a look at it.
Beastmoon Chests
Beastmoon chests are modified versions of the school's spells. They are weaker but it allows other schools to use them. There is Beastmoon Burn which applies 75 damage to an enemy over 3 rounds, Beastmoon Blade which gives a +50 blade, Beastmoon Shield which gives a +50 absorb, Beastmoon Curse +50 trap, Beastmoon Boon giving 1 to to an ally, Beastmoon Blessing which is a 50 hp heal, and Beastmoon Pixie which gives 75 hp over 3 rounds.
Battle Coins
Battle Coins are used to buy Battle Cards. They are exclusive only that can be used in the Beastmoon arena. You can buy more copies of your spells and you can collect up to 100 MAX, you can get said coins from Beastmoon chests or from an elder Beastmoon plant.
You do not have permission to send messages in this channel.
Beastmoon Specific Rewards
Threads and Moonstones
Thread and Moonstones are special rewards from the Beastmoon Hunt. They also drop from Beastmoon Plants. Thread is mainly used to craft the Beastmoon Gear. Thread is a frequent drop, notice that you may need school specific thread to craft certain Gear. Moonstone all differ in their rarity, some can only be obtained throughout Beastmoon Seeds. Moonstones are necessary to upgrade Beastforms together with Lunari.
Lunari
Lunari is the currency used in beastmoon hunt. Lunari can be used for a variety of things such as acquiring new beastforms, and buying crafting recipes like for the robes you can get from Ataceon. You can only hold up to 5000 Lunari at a time.
Beastmoon Seeds
While the Beastmoon Hunt is active you receive different rewards as you gain more points. One of the rewards is called a Beastmoon Seed, you can get 1 per match from the mode itself and you can get 2 seeds from getting 10 points in the event. These seeds are very unique compared to any other seed. Aside from being from an event these seeds grow incredibly fast.
What you need to grow this seed
In order to plant this seed first you will need a beastmoon planter. This seed will have no pests and no needs as it grows.
Time for growth and rewards
This seed once you plant it will take 5 minutes to go from seedling to young, 1 minute from young to mature, and 45 minutes from mature to elder. The basic beastmoon seed drops low tier treasure cards such as the 7 level 1 school spells, as well as the balance moonstone, Eldritch Thread, Elemental Moonstone, Hunters Moonstone, and the Spirit Moonstone.
Other Types of Beastmoon Seeds
Aside from the regular Beastmoon Seed there are school seeds that have different drops. Each of the school seeds during this event drop special treasure cards that can help craft your lore spells, as well as tc that are useful in general. In order to craft these seeds you will need to get the specific runes for them, these runes aren’t that hard to get luckily.