
Napoleguin
A Try-Hard’s Guide to the Spiral.
Here is a book written by Pirate101’s biggest tryhard.
Questing Through the Game Quickly and Easily
How to Farm Quickly and Easily
Dreadnought Ashes of the Armada:
Cool Ranch Part I (Level 15-20)
Gear, Decks,Companions,and Pets.
Combination of Support and Damage Carry
How the Different Companion Types are Best Used to Compliment Each Other
Standard Privateer Companions:
Standard Swashbuckler Companions:
Standard Musketeer Companions:
Standard Witchdoctor Companions:
Standard Buccaneer Companions:
Alternatives for Swashbuckler:
Everything You Need to Know About Pets.
The Fastest way to get a good pet:
A Good Player Will Be Competent Both as a 1v1 Player and in Team PvP.
Prioritize the Protection of your Damage Carries and Other High Value Units.
Swashbuckler’s Make Horrible Early Game Damage Carries.
The Effectiveness of Purge Magic, and Surge of Technomancy.
The Offensive Use of Slows to Prevent Counter Charges:
Random Tips for Random Places:
Prologue
Welcome, if you’re reading this you no doubt have nostalgia for this once great game, you are interested in hearing the tips and tales of someone who once loved this game dearly, and now has a plan moving forward. There is some little hope, so here is my brain dump.
Let us speak of combat in general and how it is best conducted. Since PvE is the simpler of the two, here’s how to PvE. It’s how to get familiar with the basics, but PvP is what you will need to perfect your skills. We will be discussing PvP later on in this book.
Picking a Pirate

If you’re picking a class for the first time, here are the strength and weaknesses of each so that you can make an informed decision for yourself on what you want to play as.
Privateer:
Privateer is the ultimate all in one. They’re bomb spammers early game, they support their team with forts, heals, and buffs, and they do hefty damage late game with assassin strikes and other melee attacks. Privateers’ main weakness is their lack of agility. This leads to them being chain food for musketlines.
Musketeer:
With 6 range, musketeer reactionary epics, and bombs, can halt the advances of an opponent down the battle board and shred into musket lines with ease. Musketeer is truly the ultimate damage carry. Musketeer’s main weakness is that they can’t move and attack at the same time.
Swashbuckler:
They have 7 movements, they have trap sense which means they take next to no damage from bombs, they have hides, they have poisons that do 1k aoe damage over 5 ticks, a black fog group hide, and curses that prevent the opposing team from healing. Although swashbucklers are a lot of fun to play as, they have 2 main weaknesses: 1, they are very squishy; 2, they can only attack at point blank range.
Witchdoctor:
Great for early game pressure, has the longest range aoes besides the privateers’ big guns, they have bird spells that give movement range and epics, and aoe health drains. Against a team with a lot of buccaneers, heat metal can also be a huge plus. Witchdoctors have 5 main weaknesses though: 1, They are the most squishy class in the game; 2, most other players train witch hunter witch triggers a retaliation that reduces spell damage by 50%; 3, they don’t come with very many good companions ( you might have to spend some money buying companions, in this meta I recommend buying Exeter in the crown shop and the Empire Bundle for Nausica ); 4, they cannot move and attack at the same time; 5, almost all of their damage is ability based.
Buccaneer:
Criticals, tankiness, and an abundance of charges are the pros of this class. As a melee class that doesn’t have trap sense, inexperienced players will struggle timing effective charges. It’s best not to use this class at all without a well coordinated team.
Picking a Presidio Companion
The short answer is that it doesn’t matter what you pick, you get much better companions during the storyline quests.
That being said, if you’re like me, you probably have a preference simply for how these companions look, so here’s how to get each of them. You can’t go wrong with any of these choices. I promise you won’t be using any of these companions in a serious PvP match.
Dead Mike - Mutiny

Birgus Latro - Squid Attack

Milo Graytail - Storm

Lucky Jack Russel - Shipwrecked

Gaspard De Vole - Armada
Picking an Origin
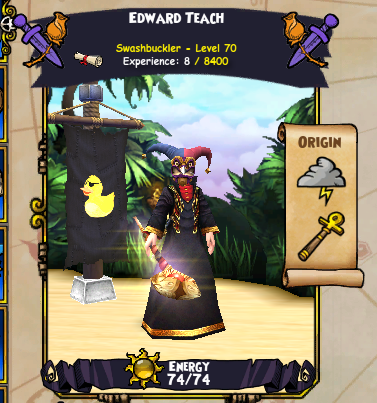
The short answer is to pick “Naturally Spooky”, but you probably want the explanation for why, so here we go.
Of the 5 possible origins, only 2 give 5% of increased stats. “Grizzleheim, Naturally Tough” and “Krokotopia, Naturally Spooky”.
The others, “MooShu, Born Warrior”, “Marleybone, Keen Eyes”, and “Skull Island, Born Sneak” all give a flat +5 stat boost. While this might be better for low level pirates, it doesn’t scale as you level up, so “Naturally Tough” and “Naturally Spooky” both end up doing more for your pirate when you finally hit level 70 which is the current max level in this game.
Why is “Naturally Spooky” superior to “Naturally Tough” you might ask, and my answer to you would be that it is immediately useful. In PvP, more so in team pvp than other forms, it’s not best to rush your Pirate into danger’s way unless you are a damage carry, and the extra health you would get from “Naturally tough” would be about 200 health which is barely one basic hit worth of damage for most companions. Pirates should do much more damage and healing than the health they themselves have during combat in order to be effective. “Naturally Spooky” affects both healing and damage for ALL classes and that is why “Naturally Spooky” is the best origin to pick.


Despite the fact that powers in this game are abysmally labeled, I know these powers are all mojo based because their damage is doubled when “Old Scratch” uses his “Flow, Mojo Flow” ability.
Questing Through the Game Quickly and Easily
While questing through the game I recommend getting help from a max level mercenary of the privateer class to help you speed run your way from skull island to Monquista. He must keep his “the big guns” up high so that he can kill everything in the first turn. It is best that you pass quickly so that moves will not take as long.

After Monquista when creatures start having more health, it is best to get help from a mercenary that has a max level musketeer. He should keep his “hail of cannon balls” up high so he can kill everything quickly within the first 2 rounds. It is best that you pass quickly so that moves will not take as long.
Your mercenary should have level 70 in nautical and a good ship. If he does, port to him and tell him what ships to sink. You get credit for sinking ships if you are onboard the ship that is doing the sinking.
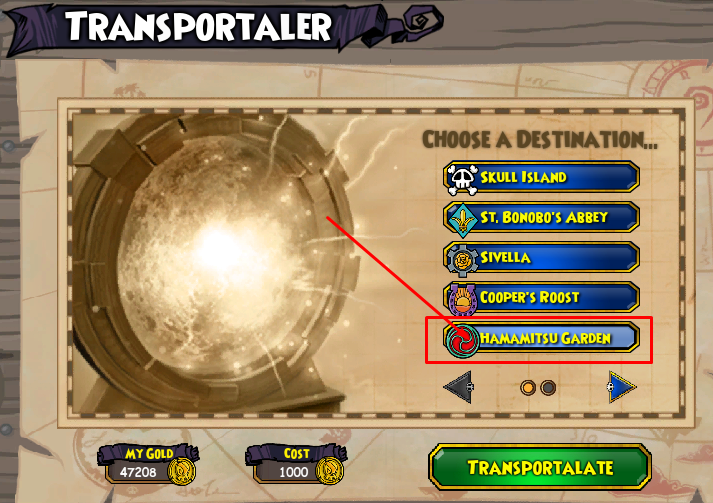
Oh, and use this guy to travel between worlds. Your welcome!
Here’s a life hack that will save you some time in the long run.
When you reach MooShu, Marleybone, or some other point in the game that gives a lot of XP, I suggest buying a couple “Enhanced XP Boost Elixirs”. This is to save you from having to do a bunch of long drawn out side quests when you finish the mainline story. When you finish it, you would be 2 or 3 levels short of level 70 which is currently the max level in this game. If you bought the potion a few times while questing through the game at a high XP point in the storyline, then you would not have this problem.


What to Train for Each Class
After reaching level 70, each pirate will get a total of 14 training points which they can use to train powers and talents from different trainers. An additional 7 training points can be gained by doing the Zeke quests.
Here are some great video guides for each of them:
Assuming you have all 21 training points, here’s a look at what each class must train to be most effective on the battle board. ( By the way, this does not include the powers and talents gained from one’s own class trainer unless stated otherwise. )
For other potential setups, you can use this training point calculator from Final Bastion before making the leap of faith
Privateer:
From the Swashbuckler trainer - “Fast (Rank 2)”, and “Walk in Shadows”. This should take 7 training points to do. From the Buccaneer trainer - “Mighty Charge”, “Kraken's Coils”, “Smashy Weapons (Rank 2)”, “Big Choppy Weapons (Rank 1)”. This should take 6 training points to do. From the Witchdoctor trainer - “Ghostwail”, “Spooky (Rank 2)”, This should take a total of 4 points to do. From the Hidden Trainer - “Witch Hunter (Rank 1)”, and “Relentless (Rank 1)”. This should take 10 training points to do.
Musketeer:
From the Swashbuckler trainer - “Fast (Rank 2)”, “Walk in Shadows”, and “Hurl Knife”. This should take 8 training points to do. From the Privateer trainer - “Valor's Shield”. This should take 3 training points to do. From the Witchdoctor trainer - “Ghostwail”, “Spooky (Rank 2)”. This should take 6 training points to do. From the Hidden Trainer - “Burst Fire (Rank 1)”, “Overwatch (Rank 2)”, and “Witch Hunter (Rank 1)”. This should take 4 training points to do.
( Be sure not to train rank 3 “double-tap” at your own trainer. You are more likely to hit from double tap 2 which is accuracy based than double 3 which is agility based. Many PvP companions and pirates will have plenty of agility. )
Swashbuckler:
From the Privateer trainer - “Valor's Shield”, and “Elusive (Rank 2)”.This should take 9 training points to do. From the Witchdoctor trainer - “Ghostwail”, “Spooky (Rank 2)”. From the Buccaneer trainer - “Smashy Weapons (Rank 2)”. This should take 4 training points to do. From the Hidden Trainer - “Witch Hunter (Rank 1)”, and “Relentless (Rank 1)”. This should take 10 training points to do.
Witchdoctor:
From the Swashbuckler trainer - “Fast (Rank 2)”, “Walk in Shadows”. This should take 7 training points to do. From Privateer - “Valor's Shield”, and “Elusive (Rank 2)”. This should take 9 training points to do. From the Hidden Trainer - “Witch Hunter (Rank 1)”. This should take 1 training point to do.
Buccaneer:
From the Privateer trainer - “Valor's Shield”, and “Elusive (Rank 2)”.This should take 9 training points to do.
From the Witchdoctor trainer - “Spooky (Rank 2)”. This should take 3 training points to do. From the Swashbuckler trainer - “Fast (Rank 2)” and “Walk in Shadows”. This should take 7 training points to do. From the Hidden Trainer - “Witch Hunter (Rank 1)”, and “Relentless (Rank 1)”. This should take 6 training points to do.
Hybrid Shooty Buccaneer:
From the Privateer trainer - “Valor's Shield”, “Rouse”, “Refresh”, and “Elusive (Rank 2)”. This should take 9 training points to do.
From the Witchdoctor trainer - “Ghostwail”. This should take 1 training point to do. From the Swashbuckler trainer - “Fast (Rank 2)”, “Walk in Shadows”. This should take 7 training points to do. From the Hidden Trainer - “Burst Fire (Rank 1)” and “Relentless (Rank 1)”. This should take 4 training points to do.
Note that “Fast (Rank 2)” is required for ALL CLASSES.
For other potential setups, you can use this training point calculator from Final Bastion before making the leap of faith.
Also, if you have any questions about the hidden trainers, here’s a guide on that.
A Guide to The Hidden Trainers
How to Farm Quickly and Easily
For farming and PvE in general, max a musketeer, equip a wand, use all bomb gear, put your bombs toward the front of your deck, and then make use of the most powerful of Old’s Scratch’s mojo buffs. If you are in a group of 4, you will get group chests every time, and you will also be able to kill everything first turn. This is the most efficient and least time consuming way to farm most things in this game.
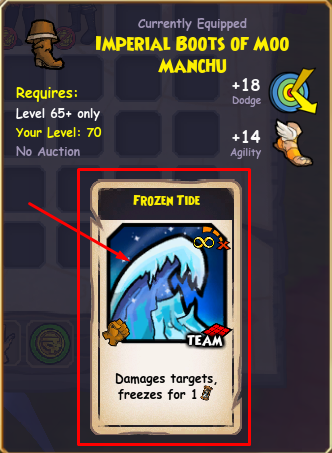
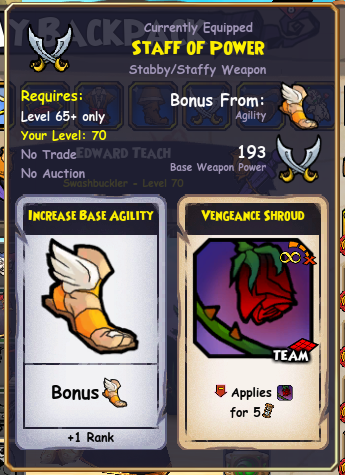
For more difficult battles like Kane, Doumo, Moo Manchu, Blightbeard, and Smugglers Arena, make use of the frozen tide boots from the tower of Moo Manchu along with the standard farming setups described in the above paragraph.
This is why I recommend maxing a musketeer first.
Here are the tide boots and how to get them:
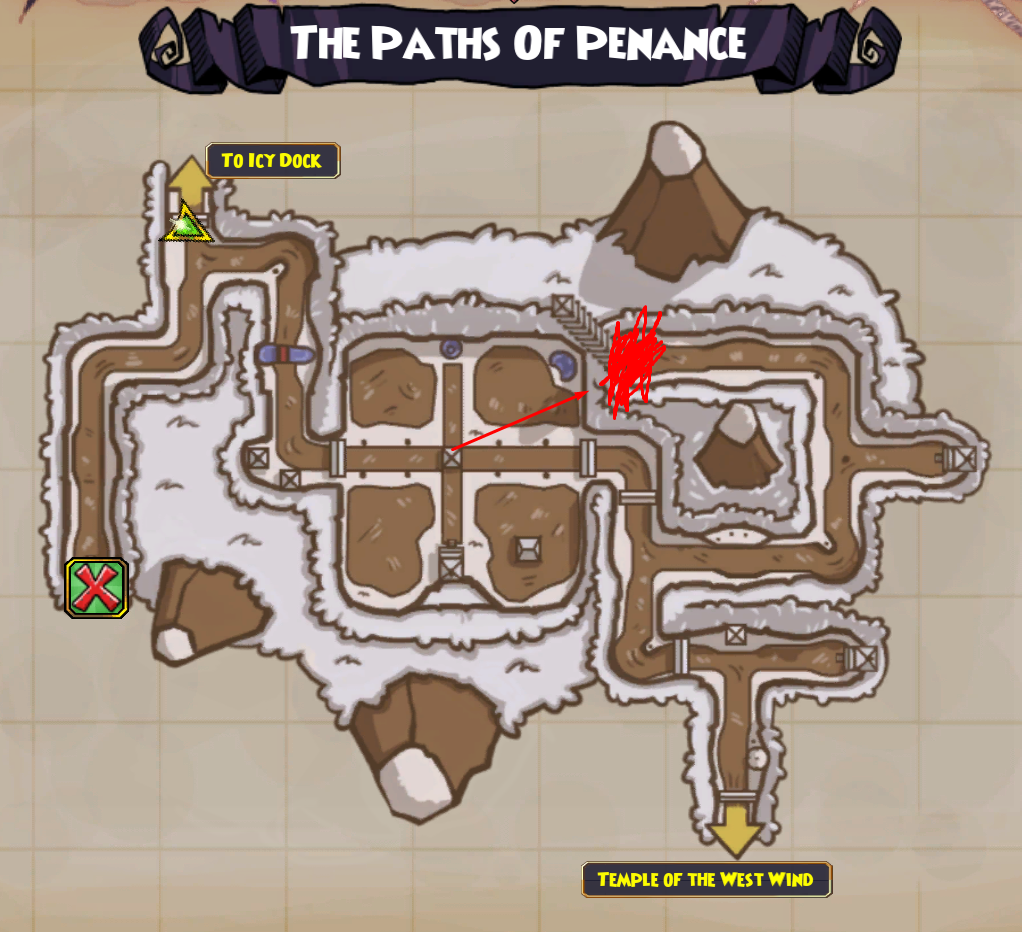

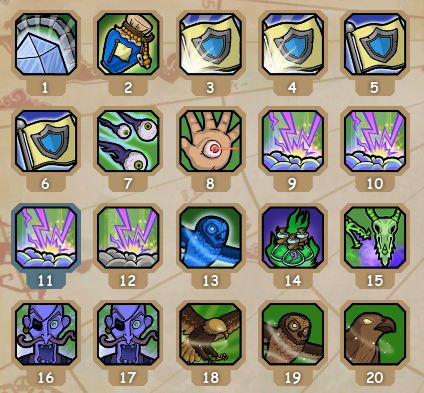
Key Farming Spots
These items will Help You a lot. Especially if you end up doing PvP. This section does not include stitching items or stat gear, but only that which will be most useful to a Pirate that is level 70 and what’s the maximize their combat potential:
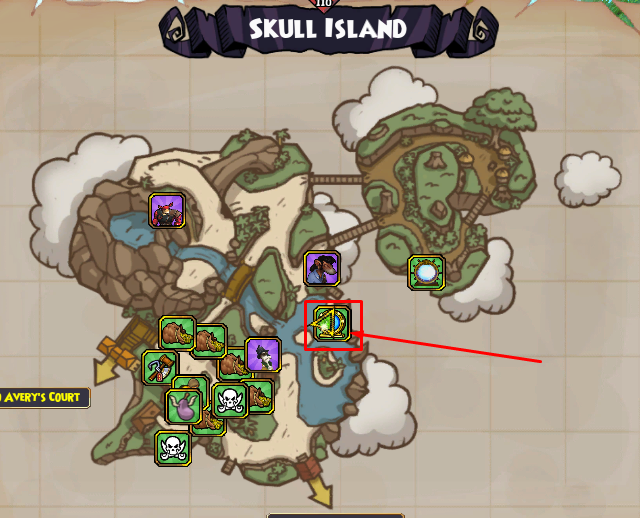
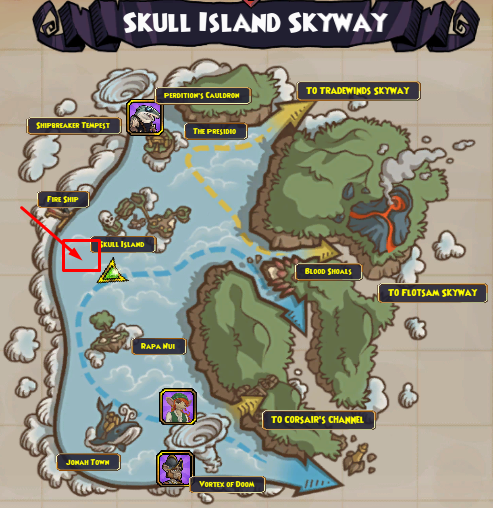
Skull Island (Level 70)
The Skull Island Bazaar:
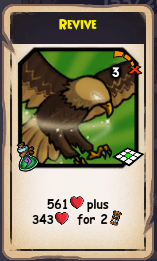
There are hats, coats, boots, totems, charms, and rings that give “revive”.
There are hats, coats, boots, totems, charms, and rings that give “mojo storm”.

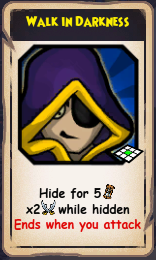
There are hats, coats, and boots that give “walk in darkness”.
There are hats, coats, and boots that give “vicious charge”.
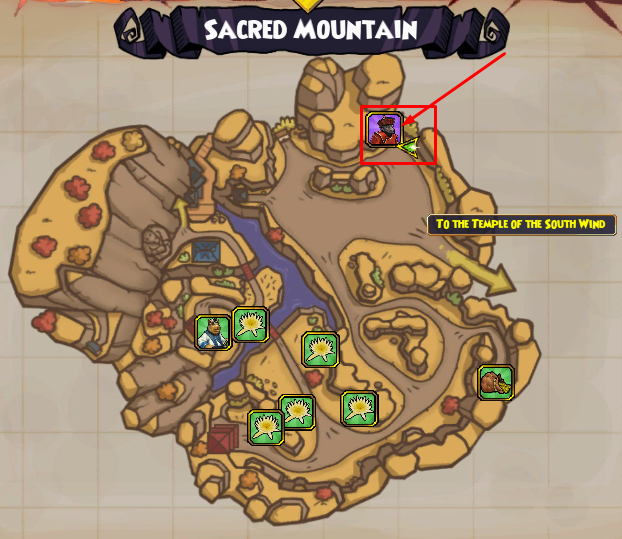
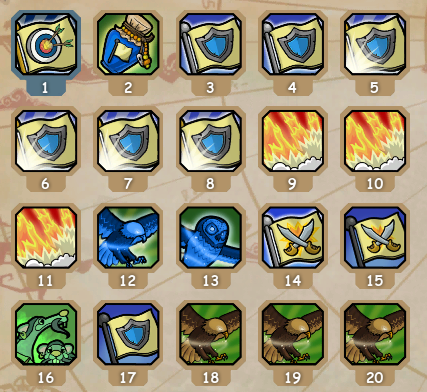
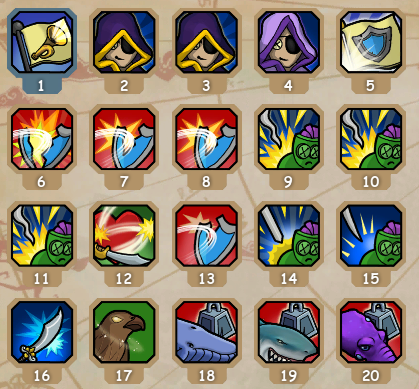
Dreadnought Ashes of the Armada:

It might take a while for it to appear.
Here’s some good stuff you can get from this dungeon.
Hybrid Melee Shooty Weapons:


Or

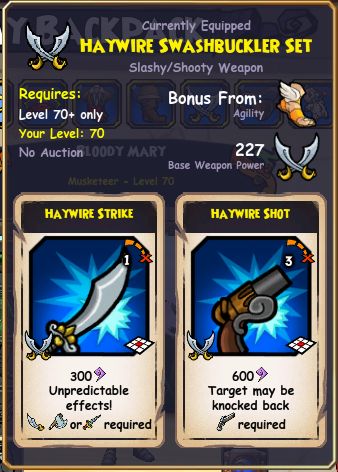
Surge Weapons:

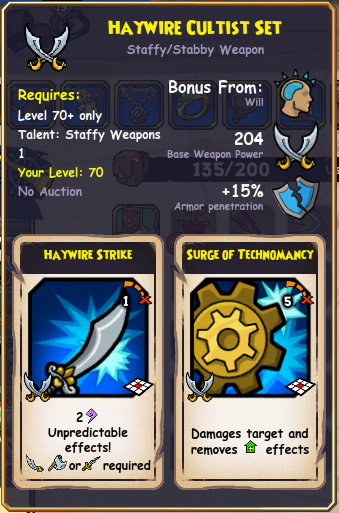
Or


5 Range Rifles


Or


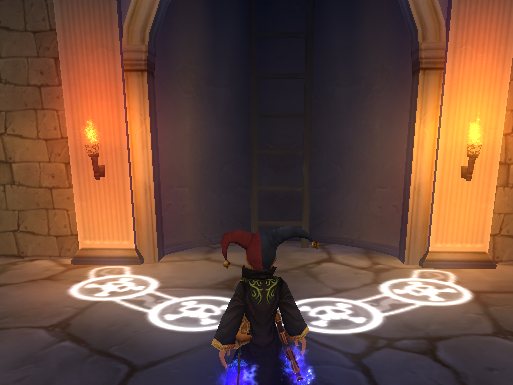
Blightbeard:


You have to complete all of the “Old Scratch” companion promotion quests in order to have access to this dungeon.

This place drops the same things that the dreadnaught armada drops. You don’t have to wait in the skyway though. There is a downside that this dungeon does not have a second chance chest and it requires an obsidian key, but it’s a great alternative if you don’t want to farm the dreadnaught.
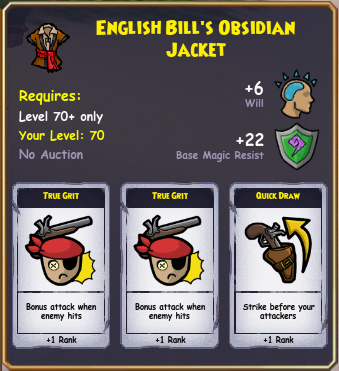
The Obsidian Duck of Death
You have to complete all of the “Old Scratch” companion promotion quests in order to have access to this dungeon.
Here’s the item you want, the “english bill’s obsidian jacket”. This when combined with a “true grit” pet, allows you to have true grit 3 which is great for some setups.


Valencia Part I (Level 10)
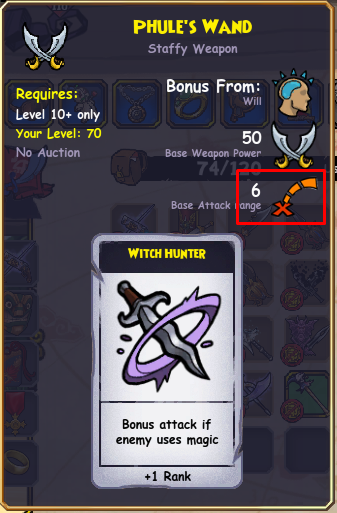
Bruno’s Chapel:
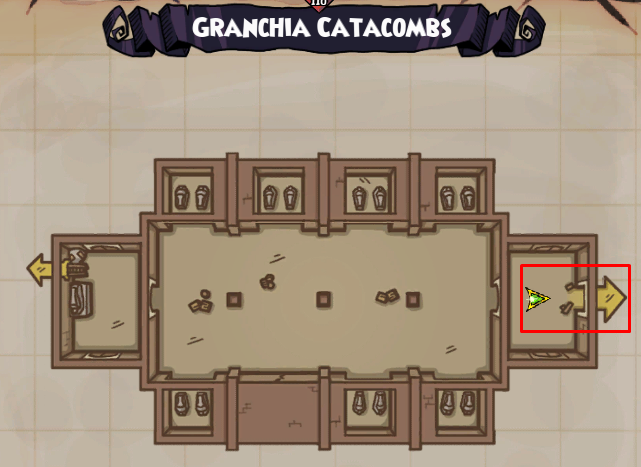
Here is the item you will want from this dungeon. Witchdoctor’s end up with 4 pages of powers to use, so it almost never comes down to a battle of basic attacks, and if it did, witches miss and fizzle a lot. The damage on this wand is bad, but the range is amazing and helps extend the reach of mojo storms among other powers that a witch has:

And then there’s the mask, mostly good as a stitch.


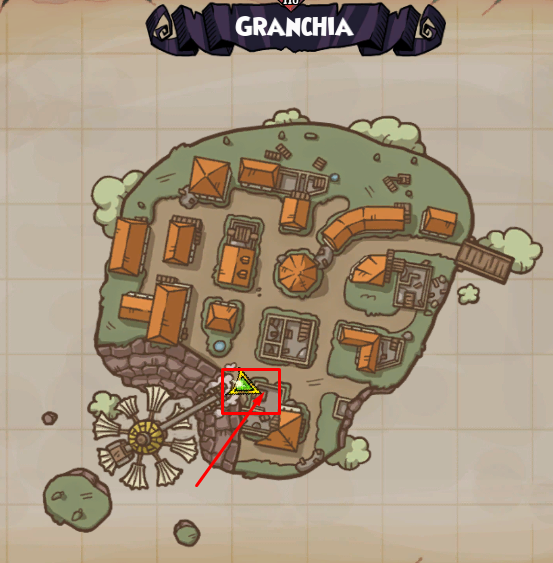
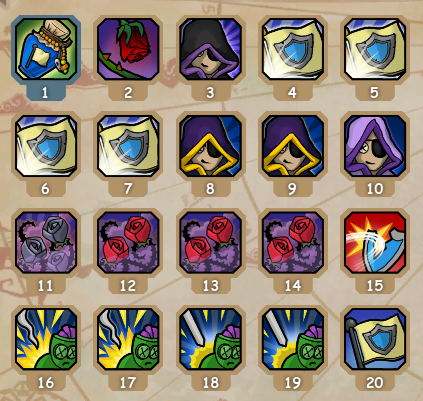
Cool Ranch Part I (Level 15-20)
Johny Ringo
(Unfortunately there are no fights with a level 15 second chance chest):

The items you want will have the “valor armor” ability. This includes a hat and boots for swashbuckler; a hat for musketeer; a totem, charm, and ring for witchdoctor; and a coat for buccaneer. Also keep an eye out for any totems, charms, and rings that give “walk in darkness”. You can ignore hat’s boots and coats that give these because you can buy those pieces at the skull island bazaar.


Castillo Sapa
(Second Chance Chest)


The items you want are Santa Rana’s hat and any gear that gives valor armor”. This includes boots for privateer, a hat and boots for swashbuckler; a coat for musketeer, and a hat for witchdoctor. Also keep an eye out for any totems, charms, and rings that give “walk in darkness”. You can ignore hat’s boots and coats that give these because you can buy those pieces at the skull island bazaar.


Banquet Hall

This dungeon has the same drops as Castilla Sapa but it’s much faster, so farm here instead if you don’t have crowns for the second chance chest.
Cool Ranch Part II (Level 30)
Old Jail House
(Unfortunately there are no fights with level 30 second chance chests)

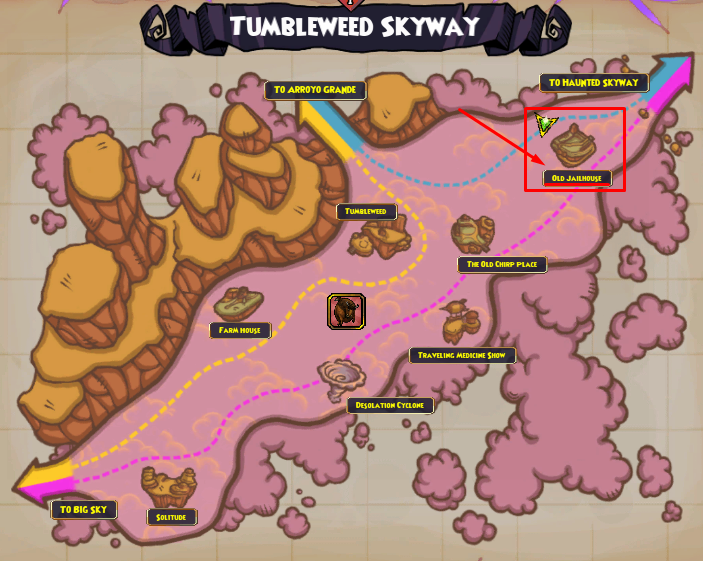
For most items, it’s better to farm the bird with no name, but the level 30 “valor armor” ring for musketeers doesn’t seem to drop there, so this is the next best place because it has 3 different chests that drop it, Old Man Bronco. Buck Bronco, and Waco Kid.
This place drops gear with the abilities “valor armor” and “walk in darkness”. This could help you build your deck more easily. As far as “valor armor” goes, there’s boots for privateer; a hat, coat, totem, charm, and ring for musketeer, and a charm for witchdoctor. There’s a ring for buccaneer that “gives walk in darkness”. It’s been very useful for a lot of buccaneers, I recommend keeping a hold of it and any other totems, charms, and rings that give that power.

The Bird with No Name
So you have to do a fairly long questline to farm this place, but at the end you get a cool looking companion and The Bird with no Name to farm. The bird with no name is super easy to farm because he’s only one fight and you only have to kill the bird himself.


This place drops gear with the abilities “valor armor” and “walk in darkness”. This could help you build your deck more easily. As far as “valor armor” goes, there’s boots for privateer; a hat, coat, totem, and a charm for musketeer, and a charm for witchdoctor. There’s a ring for buccaneer that gives “walk in darkness”. It’s been very useful for a lot of buccaneers, I recommend keeping a hold of it and any other totems, charms, and rings that give that power.
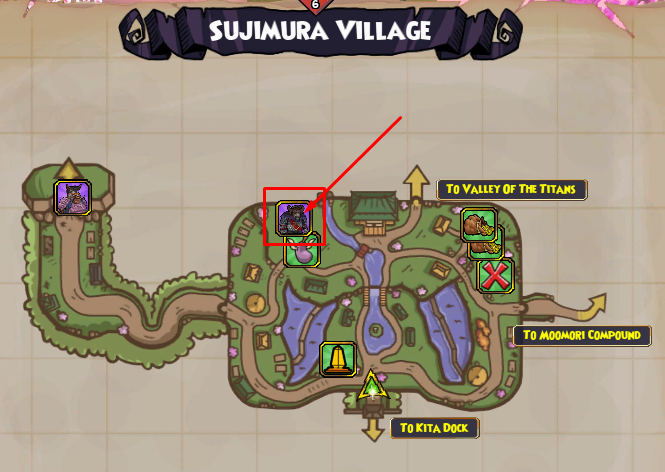
Mooshu (Level 35-45)
Stormzilla
(Level 45):
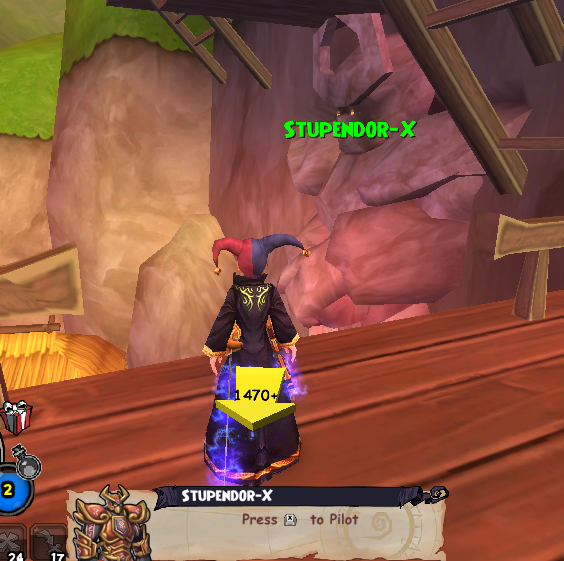
Here is what you will be farming for.

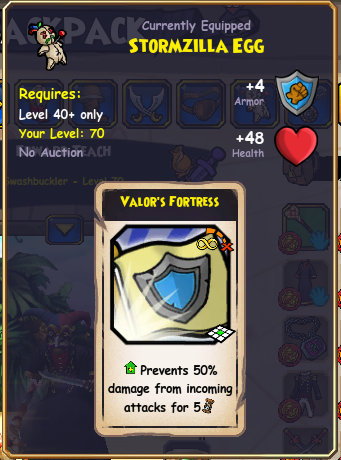
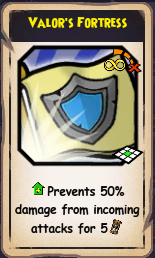
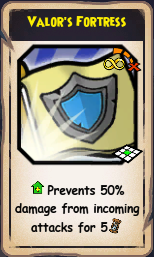
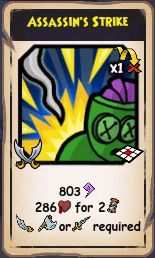
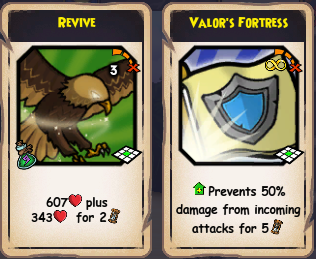
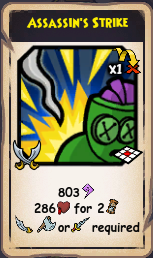
There is also a totem, a charm, and a ring that gives “valor’s fortress” for buccaneer. There is also a totem and ring for privateer that gives “assassin strike”.

Lo Pan
(Level 45):


Here are the items you will want from this dungeon. Besides the unique Lo Pan gear, he also drops an “assassin strike” hat and coat for buccaneer, a “valor’s fortress” ring charm, and totem for musketeer; an “assassin strike” totem, charm, and ring for privateer, a “valor’s fortress” hat and boots for swashbuckler, and a “valor’s fortress” totem for witchdoctor.


The robe is more for stitch, but that hat could be useful for buccaneers when countering swashbucklers as they go into hidden without a “valor’s fortress” on.
Sato
(Level 50):
Here’s the good stuff he drops.


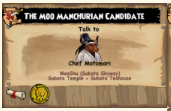
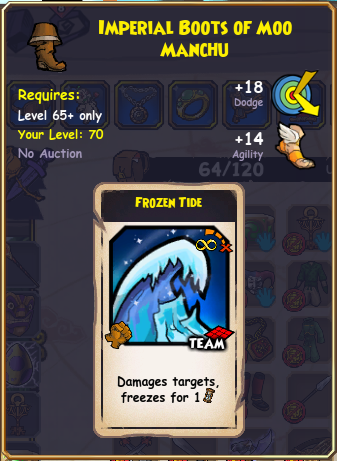
Old Moo Manchu
[The Tomb of Kow Cheng (Level 45)]:

In order to gain access to this dungeon, you will need to do this line of quests:

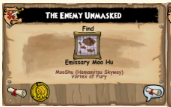
Here’s what he drops, and yes he does have a second chance chest:

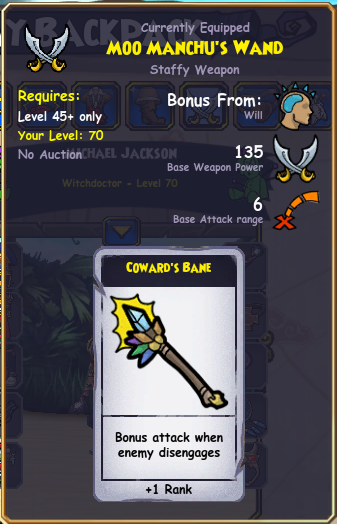
The Tower of Moo Manchu
(Level 55-65)
Moo Manchu himself drops 2 items that are particularly useful, and they are the “swashbuckler staff of power” and the “frozen tide boots”:


He has other unique drops, but none of them are very good.
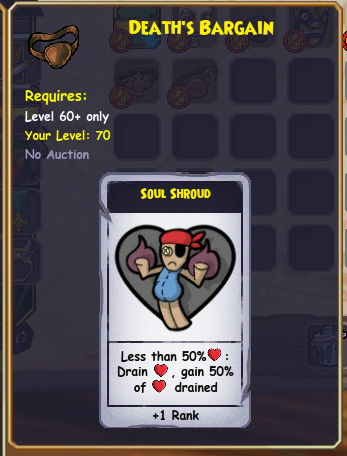
The Nefarious 5 drop 2 items that are really nice to have as well, and they are the “nefarious knives” and “death’s bargain”.


There is also some class specific gear that drops throughout the dungeon, but mostly in group chests.

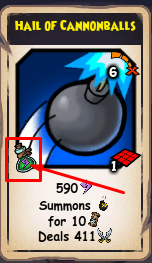
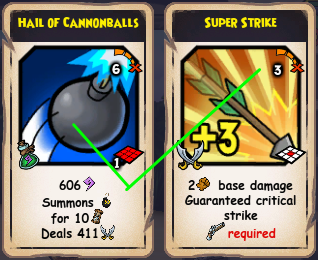
Musketeers have a hat and a totem that gives “ranged super strike” and “hail of cannon balls”. They also have a coat and a charm that gives “claw trap” and “hail of cannonballs”. “Hail of cannon balls” is really nice to have, especially in team PvP. Don’t bother keeping the pieces of gear that give super strike and “claw trap”. There are level 55, 60, and 65 versions of this gear. The level doesn’t matter. It only matters what cards they give.


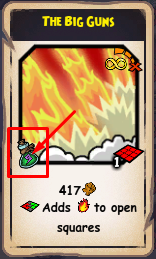
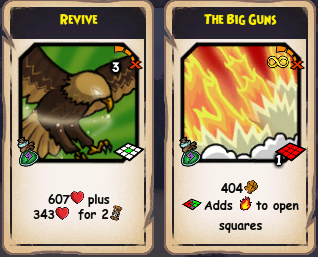
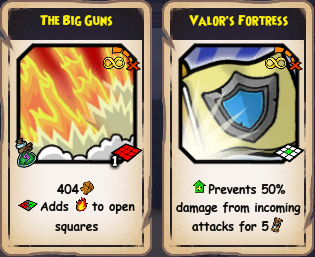
Privateer has a hat and a totem that give “revive” and “valor’s fortress”, a coat and a charm that give “revive” and “the big guns”, and lastly they have boots and a ring that give “the big guns” and a “valor fortress”. Keep a hold of at least one of each of these items. Although the level ranges from 55-65, level does not matter, only the abilities these pieces give.
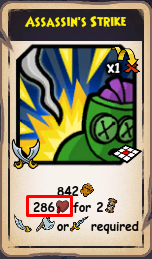
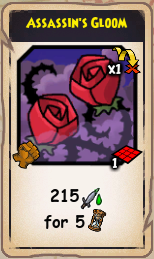
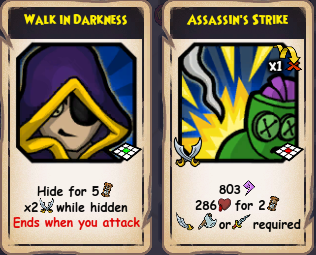
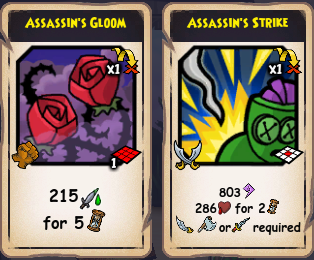
Swashbuckler has a hat and a totem that give “assassin strike” and “ walk in darkness”, a coat and charm that give “walk in darkness” and “assassin’s gloom”, and they have boots and a ring that gives “assassin strike” and assassin’s mist”. Keep a hold of at least one piece for each, and although there are versions that are 55, 60, and 65, the level doesn’t really matter, only what powers they give.

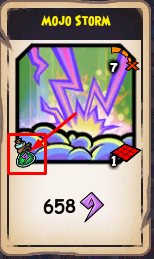
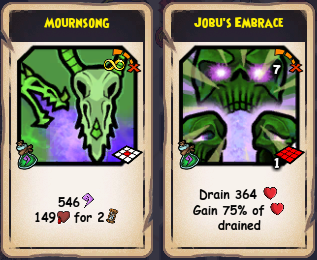
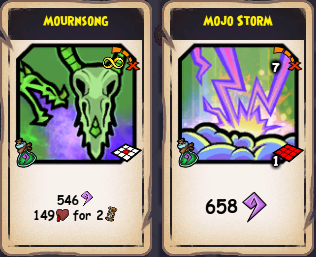
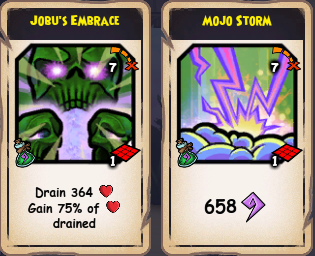
Witchdoctor has a hat and a totem that has “mourn song” and “jubus embrace”, a coat and a charm that give “mojo storm” and “mourn song”, and boots and ring that gives “mojo storm” and “jubus embrace”. Although there are 55, 60, and 65 versions for each piece, level does not matter, only the powers that each piece gives.
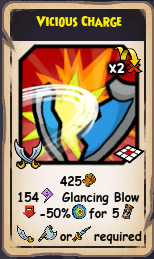
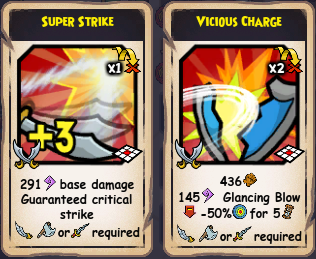
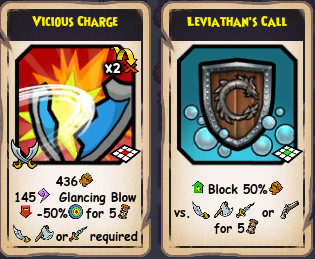
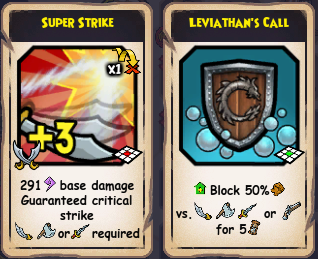
Buccaneer has a hat and a charm that gives “super strike melee” and “vicious charge”. They are the best pieces a buccaneer can get from this dungeon, but the coat and the charms which give “vicious charge” and and “leviathans call” are pretty decent, especially in 1v1 situations vs other buccaneers. It’s the same for the boots and the ring which give “super strike” and “leviathans call”. “Leviathans call” can easily be pierced with “poisons”, “mourn songs”, “hail of cannons balls”, “scatter blasts”, and “trick shots” of all kinds, so it is essentially useless and team PvP, and rarely useful in 1v1s. Focus on getting that hat and the totem, the others are nice to have around but not nearly as important. Once again level does not matter, it only matters what powers the gear gives.
Marleybone (Level 50 - 55):
Bishop
(Level 50 - 55):
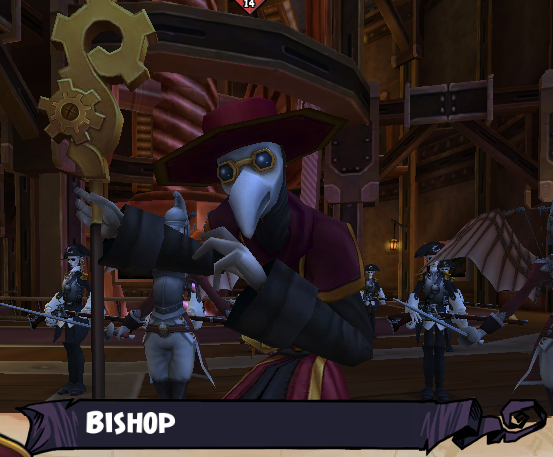
If you have crowns to spend, I recommend doing the entire dungeon and hitting the second chance chest the 2nd time you encounter Bishop. Otherwise, it’s advisable that you only do the first fight since it’s much quicker than running the entire dungeon.
Here are the main items to farm for:


Unless you’re the damage carry on your team, having this piece of gear is vital to defend your units from the threat of juggernauts.
There is some gear that gives either “valor’s fortress” or “assassin strike”. For buccaneer, there’s a hat that gives “valor’s fortress” and a robe that gives assassin strike, and for witchdoctor there’s a robe that gives “valor’s fortress”. Keep a hold of these pieces of gear if they drop. They are also common drops everywhere in Marleybone, especially in group chests.
Tyler (Level 50 - 55):

Tyler's most prized drop is the “assassin strike” eye patch for buccaneer, but he also has a few other pieces that are well worth farming for. He can be viewed as an easier to farm version of Rooke without the second chance chest. We’ll be getting to Rooke in just a bit, but here are some items you might want to get your hands on from this fight:
Privateer gets a totem with “vicious charge” and a charm that gives “assassin strike”. Buccaneer gets a hat that gives “valor fortress”, a robe that “gives assassin” strike, an eye patch that gives “assassin strike”, and a charm that gives “valor fortress”. Witchdoctor gets a robe that gives “valor’s fortress”, and a charm that gives “valor’s fortress”
Rooke
(Level 50 - 55):
This fight drops the same items as Tyler, but you have to complete the entire dungeon in order to reach him. On the bright side, he has a second chance chest which makes him totally worth fighting through if you have the crowns for it.
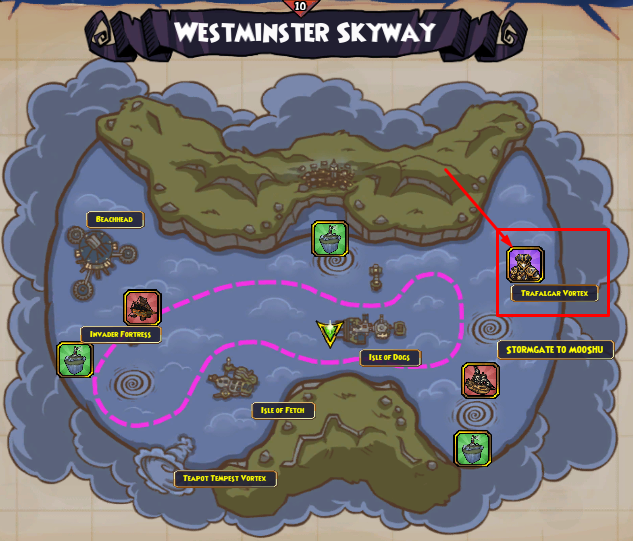
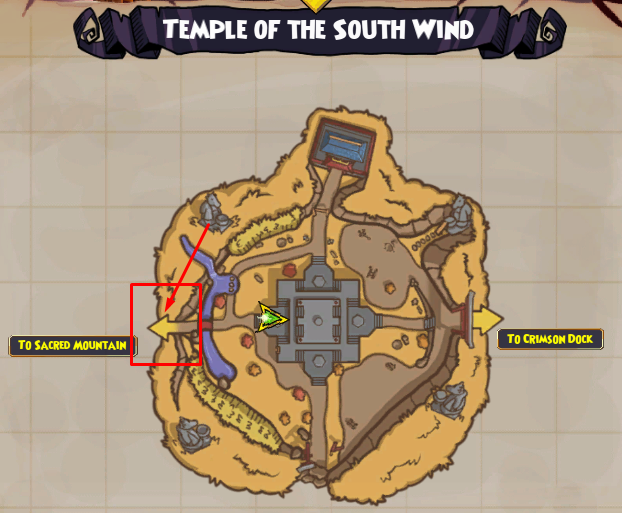
Aquila (Level 55 - 60):
Talos
(Level 55 - 60, Second Chance Chest Included)

Most places in Aquila, including this place, drops a “valor’s fortress” robe for buccaneer, an “assassin strike” robe for privateer, and “valor’s fortress” boots for swashbuckler.
Some even more prized pieces are the “valor’s fortress” eye patch for swashbuckler, a “the big guns” eye patch and an “assassin strike” ring for privateer, and a “valor’s fortress” charm for musketeer.
Dyskolos
(Level 55-60, No Second Chance Chest Included):
This guy drops the same things as Talos, but it’s a way shorter dungeon and there’s no second chance chest.

Labyrinth
(Level 55-60, Second Chance Chest Included)
There are separate minotaurs that all drop the “the axe of the minotaur lord”. This weapon gives a guaranteed epic called followthrough which is why this weapon is high priority as a drop for buccaneer.


Valencia Part II
(Level 70):
Kane
(Level 70, Second Chance Chest Included):

There’s a higher level of the “bishop” creature in this dungeon and he drops the “sprocket key” and “technomage glasses”, but I’m fairly certain it doesn’t drop in the second chance chest. That being said it does seem to have a higher drop rate than the bishop dungeon, so it might be worth a trying to farm it here instead of the one in Marleybone.


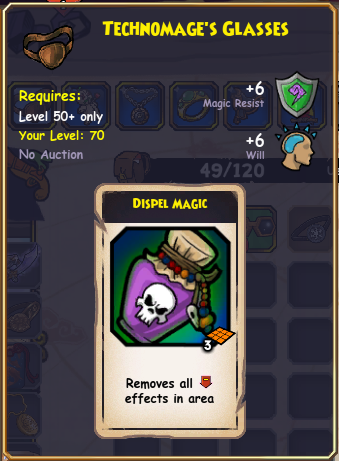
Here are the exclusive items you will want to farm here and these are also the items that drop in the second chance chest:
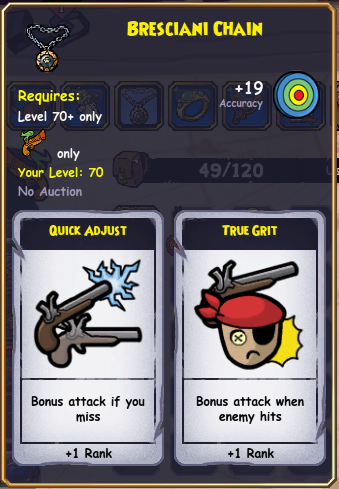
For musketeer, a hat, coat, boots, totem, charm, and ring that all give “quick adjust” and “true grit.”
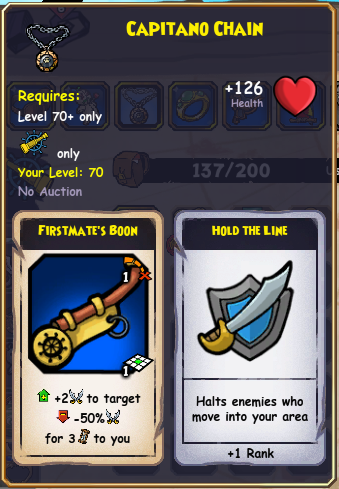
For privateer, a hat, coat, boots, totem, charm, and ring that all give “first mate’s boon” and “hold the line”
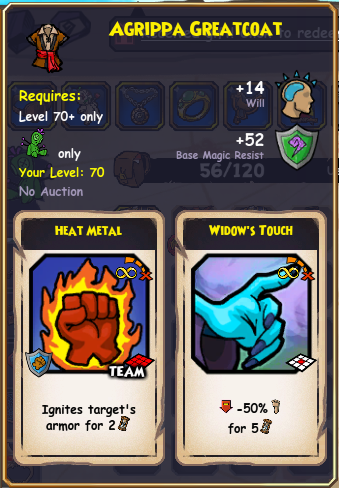
For witchdoctor, a hat, coat, boots, totem, charm, and ring that all give “heat metal” and “widow’s touch”
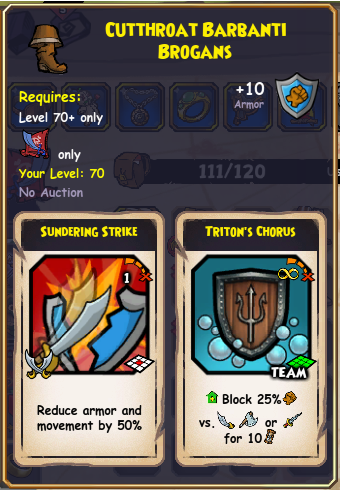
For buccaneer, a hat, coat, boots, totem, charm, and ring that all give “sundering strike” and “triton’s chorus”
And that’s all of the good gear in this game.
Decks,Companions,and Pets.
Decks:
There are 3 roles for every class in player vs player combat. These roles are as follows...
Supports, Damage Carries, and Mixtures of Both.
It doesn’t matter what gear slots you use to get these powers. All that matters is that you can build similar decks. That being said, here's a guide with even more details on where to get gear. Each of these guides are timed stamped in the description so that you can find the information you need with ease: Privateer, Swashbuckler, Witchdoctor, Musketeer, Buccaneer.
Supports
I will start with advice for the supports:
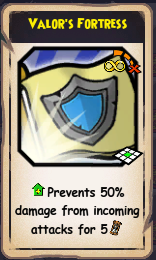
Build a deck with plenty of “valor’s fortresses” and “valor’s armors”. A good support will have at least 4 valor fortresses or “valor’s armors”, and it is generally best if privateers take this role because they also have group heals and other team buffs from their trainers, but if this is not possible, witchdoctor, and swashbuckler and the next best classes for the support role. Supports should take the first place on their team’s sigil so that they can be of greater effect to those that move after.
Group heals are of great use in the early game, while local heals are generally best in the mid to late game.
Here is an example of some support setups:
For Privateer:

For Witchdoctor:

For Swashbuckler:
Damage Carries
Now we move on to the subject of damage carries
Unlike supports, this role requires a deck full of attacks with almost no protections. Hides help. Pack as many solid attacks as you can. For musketeer I recommend packing one valor fortress, one valor armor, and one heal. This is because of the limitations the coat, boots, and ring have for this class. The damage carry is most useful when he is the 3rd player on the sigil.
Here are some deck setups for damage carries:
For Musketeer:
or

For Buccaneer:
or

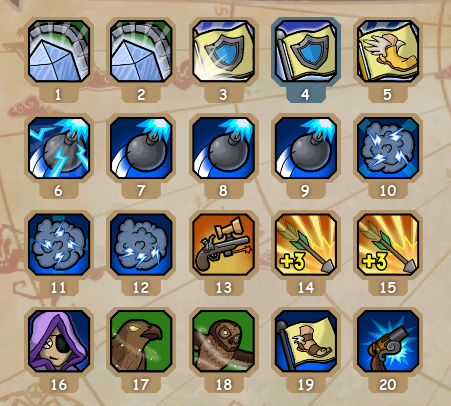
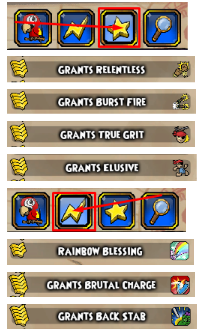
Another possibility is Hybrid Shooty Buccaneer, but this only works if you have “English Bill’s Obsidian Jacket” and a pet that grants “Relentless”, “Burst Fire”, “True Grit”, and “Elusive”:
or

In theory, this will completely shut down musketeers. It will negate many of the problems of taking extra damage that hybrid shooty melee buccaneers would have otherwise.
For Witchdoctor:

Combination of Support and Damage Carry
Lastly we will discuss the combination of support and damage carry.
It’s pretty straight forward, they act as another support in the early game, but in the late and late mid game, they are also a great damage output. A variant of these setups is also what’s usually most useful in 1v1 matches. This role is most useful when given to the player that is second on the sigil.
Here are some deck setups for a mixture of support and damage carry:
For Swashbuckler:
or
For Witchdoctor:
Companions:
There are two kinds of companions that are most effective in a battle, and they are line companions and charging companions.
Line companions are those companions that can hold a formation at the beginning of their turn and attack without having to move.
Charging companions are those that have great movement or a great gap closer like “vicious charge”, “brutal charge”, or “centaur charge”. Their main weakness is that they usually can only attack at point blank range, Nausica being the exception to this rule.
Line Companions
For line companions (primarily musketeer companions) they can further be divided into 3 classes: damage carry, crowd control, and utility.
An example of a damage carry line companion would be
Bonnie Anne because she has the ability to get all of the best chaining epics (“rank 2 burst-fire”, and “rank 2 double tap”).
An example of a crowd control line companion would be Exeter because he has “maelstroms” which reduce the movement of a group, he has “musketeer’s metal” which reduces a target’s will and weapon power by 50% for 3 turns, and he is best setup with “rank 3 true grit” which can stun in reaction to a musketeer's base attack or other epics.
An example of a utility line companion would be Emmett or Bonnie Anne because of their healing abilities. Another utility line companion is Chantal Livingstone because of her agility buff, “cloud spirit”.
Charging Companions
For charging companions (primarily melee companions) They can further be divided into 3 classes: damage carry, crowd control, and utility.
All charging companions should be damage carry companions at least on their initial hit. Their entire use depends on it. However they are often accompanied by utility and crowd control elements.
Some examples of utility charging companions are Contessa Argento because her “gallant defense” helps buccaneer pirates and other charging damage carry units survive longer, and Fan Flanders and Peter Quint are also utility charging companions because of their base stat buffs.
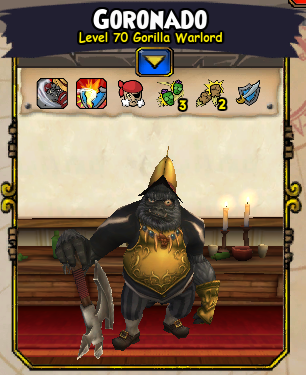
Some examples of charging companions that have crowd control elements are Goronado and Peter Quint because “vicious charge” and “brutal charge” have a 50% accuracy reduction that lasts for 5 turns.
How the Different Companion Types are Best Used to Compliment Each Other
Many companions are a mixture of multiple types. Nausica for example is a mix between a line companion and a charging companion and can be used in both roles. Emmett is a mixture between a utility companion and a crowd control companion, and Bonnie is a mixture between a damage carry, a crowd control, and a utility companion because of her chains, heal, and scatter blast.
Alright, now here’s the reason I’ve classified these companions. When making use of your charging companions it is best to send them in proceeded by a juggernaut damage carry like a well forted buccaneer, musketeer, or Nausica. The line companions must also move up in formation and within range of the opponents line companions. Aside from picking off isolated companions, charging companions must be used in this way to be most effective.
As for the types of line companions and why I’ve classified them, here is why. It is best to use slows from crowd control line companions to prevent a counter charge, damage reductions to lesson the further impact of a successful or otherwise charge, and of course heals from utility line companions when they are must advantageous, particularly group heals, and Bonnie Anne’s “second wind” on a pirate or other damage carries that is far downfield or that desperately needs a heal to stay alive.
Review:
- Line Companions
Damage Carry
Utility
Crowd Control
- Charging Companions
Damage Carry
Utility
Crowd Control
Standard Companion Setups
Standard Privateer Companions:

Here’s an Exeter guide with more details and other setups

Here’s an Emmett guide with more details and other setups
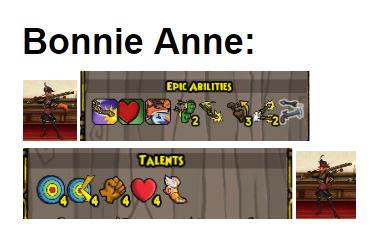
Here’s a Bonnie Anne guide with more details and other setups
Standard Swashbuckler Companions:
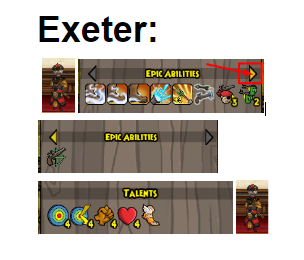
Here’s an Exeter guide with more details and other setups

Here’s a Bonnie Anne guide with more details and other setups

Here’s a Nausica guide with more details and other setups
Standard Musketeer Companions:
Here’s an Exeter guide with more details and other setups
Here’s a Bonnie Anne guide with more details and other setups
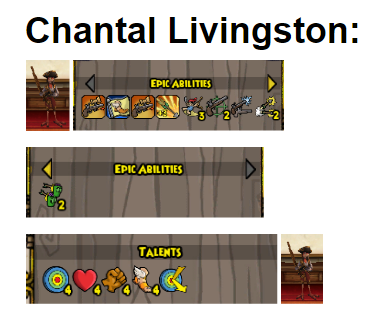
Here’s a Chantal Livingstone guide with more details and other setups
Standard Witchdoctor Companions:
Here’s an Exeter guide with more details and other setups
Here’s a Bonnie Anne guide with more details and other setups
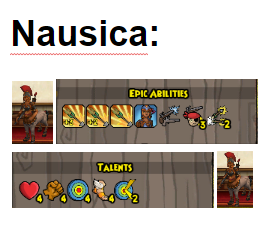
Here’s a Nausica guide with more details and other setups
Standard Buccaneer Companions:
Here’s an Exeter guide with more details and other setups
Here’s a Nausica guide with more details and other setups

Here’s a Nausica guide with more details and other setups
Alternative Companions
Alternatives for Privateer:
As a privateer these companions are a decent replacement for exeter if you don’t have him. They don’t have the mass slows or the weapon reduces, but they have superior range except for Bill who has the same range as Exeter.

Here’s a Pepe Detorteau guide with more details and other setups
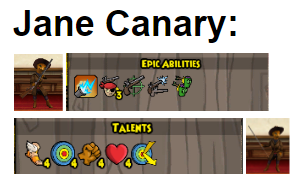
Here’s a Jane Canary guide with more details and other setups.
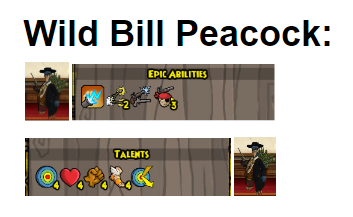
Here’s a Bill Peacock guide with more details and other setups
Alternatives for Swashbuckler:
If you’re using the free to play companions as a swashbuckler, I suggest using Buffalo Bill instead of Exeter, and Fan Flanders instead of Nausica. In some cases it’s actually better to bring Fan Flanders instead of Nausica especially if you’re fighting a team with a lot of buccaneer units.
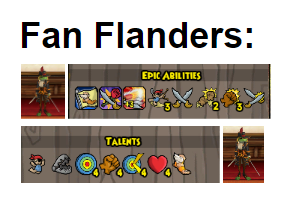
Here’s a Fan Flanders guide with more details and other setups
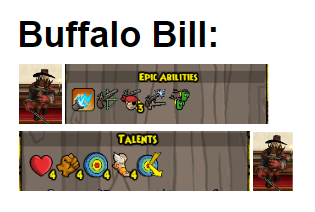
Here’s a Buffalo Bill guide with more details and other setups.
If you have crowns to spend and you want another charging unit on your team, consider using Goronado. He’s great for swashbuckler, buccaneer, and witchdoctor.
Alternatives for Musketeer:
If you’re using the free to play companions as a musketeer and you don’t feel like using Contessa, here are some other companions you might want to try.
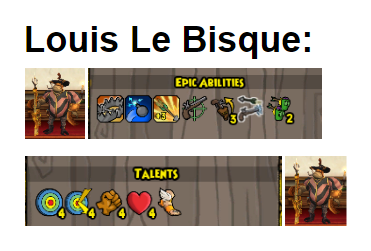
Here’s a Louis Le Bisque guide with more details and other setups
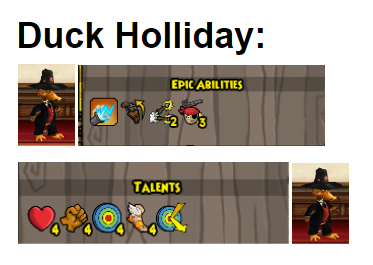
Here’s a Duck Holliday guide with more details on and other setups
For buccaneers, they have the best melee charging unit in the game. It’s free and a staple for teams that have an abundance of charging units.

Here’s a Peter Quint guide with more details and other setups
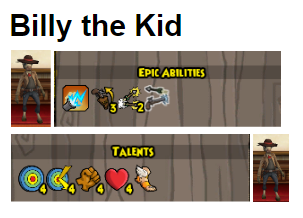
Here’s a Billy the Kid Guide with more details and other setups
Alternatives for all Class:
This companion is great for pressuring and ensuring kills, but she dies almost immediately, so using her can be a bit tricky. With the use of “gallant defense” she’s also good as temporary protection for a charging buccaneer.

Here’s a Contessa guide with more details and other setups
If you have crowns to spend and you want another charging unit on your team consider using Goronado. He’s great for swashbuckler, buccaneer, and witchdoctor.

Here’s a Goronado guide with more details and other setups
Everything You Need to Know About Pets.
The Essentials:
There are grants that are good for some classes, that not having them puts you at a huge disadvantage. Many of the other grants are nice but not nearly as important.
Musketeer:


Buccaneer:


Swashbuckler:


The Perfect Pet:
Here is what the perfect pet for each class would have. Focus on the essentials though. Many of the game’s best players don’t have perfect pets. It’s important to note that in 1v1s the perfect pet is often situational, but in 3v3s you have to guard against all possibilities, so the perfect pet in that case is much easier to define.
Privateer:


Witchdoctor:


Musketeer:


Swashbuckler:


Or the other one if it gives “turn the tide” to the Pirate and not the Pet. The developers messed up when naming this grant originally, so there are two grants for “turn the tide” that both grant them to a pirate that has the pet equipped.


Buccaneer:


Hybrid Shooty Buccaneer:


The Fastest way to get a good pet:
You will most likely start with a pet from a quest, the crown-shop, or it will be gained from pet wrangling or as boss loot. These pets are known as first generation pets. They have 100% original pools which means the majority of what they give is not going to be ideal. Well, that’s what this part of the guide is for. Welcome to the morphing tent!
When you have your first generation pet to level 30 you can start morphing with better pets. Many people on discord servers and other social media platforms will have a pet album for you to look through.
Here’s mine as an example:
The Pet Album of TheFearsomeRubberDucky and Associates.
After morphing with the pet you want, get the new pet to adult (level 30). This is a second generation pet and will have roughly half of the pool from your old pet and half of the pool from the pet you morphed with.
When you’ve gotten the 2nd generation pet to adult, morph it with your friend's pet again and you get the product of that morph to adult, you will have a 3rd generation pet ready to morph to the next generation.
Wash, rinse, repeat this till you get a clone of your friend’s pet pool. When you have this morph that pet again with your friend’s pet so that you will have two clones that you can use to self morph to make even more pets with a cloned pool.
It’s random how talents and powers manifest, so be sure to morph about 10-15 pets for each of your 6 pirates, and, by the way, you could have at least 6 level 3 of higher pirates to take advantage of the extra energy for training. Pirate101 is unlike wizard101 in the fact that transferring pets does not affect your energy.
Access to the morphing tent, good pet snacks, and a good source of gold for morphing is also important.
Here is the quest you need in order to access the morphing tent.

Just do that quest until you have access to the area, and once you're in, you will want to check out the pet snacks vendor inside. This is a great place to get good snacks for the low prices of 650 gold each.


You’ll need plenty of gold for your new hobby, so here’s the best place and method to farm for it.
Pirate101 - Ultimate Gold and Scrip Farming Guide ( Spring 2020 )
The Art of PvP
It must be taken into consideration that those who have the best gear have often been defeated by those who have the worst, so I will start with some basic concepts and tricks rather than making the gear the focus of this guide. I wish to make 10 clear points that will be of more use than the best gear or pets this game has to offer.
10 Points Worth Considering:
A Good Player Will Be Competent Both as a 1v1 Player and in Team PvP.
Do not wait for the perfect gear to start doing PvP. Start by doing PvPand then make adjustments from there. As long as you have at least one valor fortress and some attacks in your deck, you will be able to beat most players in this community if you are skilled at the game. Pay no attention to the stats a gear has, Pirate101 is an ability based game so these things are largely relevant.
Because of the ease for which 1v1s are obtained, it is best to constantly be at battle with their use while starting out. Don’t take them too seriously because they are more easily affected by RNG and broken mechanics than team battles are, but always use them to learn from your mistakes.
A competent player will be so good at the game that they will be able to lead a completely new team in battle and at least beat all of the less competent teams, if not some of the more competent teams from time to time. Do as many team battles as you can because this will help you out a lot in becoming better at the game. Be good at anything is not for the faint at heart, so be persistent!
Ensure Your Kills Whenever Possible, Focus Fire Instead of Greeding for Chains, Luck Criticals, and High Rolls:
This is why it’s best to use companions that have a strong guaranteed hit, good range, and good movement. It’s also a great idea to have plenty of strong guaranteed hits in your deck as well as a weapon that has the best range possible for classes such as musketeer and witchdoctor, who, particularly in team battles, are the primary damage carries. There are situations where your only chance of winning is trying to get some lucky chains, this situation is the exception, of course.
Prioritize the Protection of your Damage Carries and Other High Value Units.
If a musketeer or another key damage carry is in a good position to attack, particularly if it is a pirate, you must prioritize keeping them alive. You must also endeavor to keep your main support alive because, if he dies he can’t use his abilities to protect the key damage carries.
Move your musketeer or damage carry up quickly. While he is one third or more down the battle board, have one fort on him to protect him from a charge from the faster units of your opponent, but when your musketeer or other key damage carry is in range to attack and is in greater risk taking even more damage, make sure he has two valor fortresses on for good measure, and keep a valor armor ready in case he loses half his health. In this way you can maximize your damage output while minimizing your casualties.
A privateer is necessary in your battles because he has great support buffs, protections and heals, if he dies, combat doesn’t usually last much longer, so when he is threatened, ALWAYS make sure he has a valor fortress on so that he doesn't die and seal the fate of the entire team.
Leave a Line of Retreat While Seizing the Initiative. Control the Map so You can Corner your Opponent While Avoiding Being Cornered Yourself.
As I have already mentioned, move forward immediately with your key damage carry, and keep your other units close behind yet out of range of your opponents. Many contemporary generals and those of ancient times have erred by sitting back, far away in corners allowing opponents to force them into moves they otherwise would not have executed. You lose the opportunity of having to regroup your team after an unfavorable exchange, and you also allow your opponent to maximize his fire power with a more favorable position. You must move up the map.
Many both ancient and contemporary generals will argue that it is best to use the first turn with combinations of sniper shots, big guns, and soul reavers among other infinite range abilities to pick off a unit for an early advantage, but what they do not consider is what moves they will be forced to make while cornered because of their short sightedness.
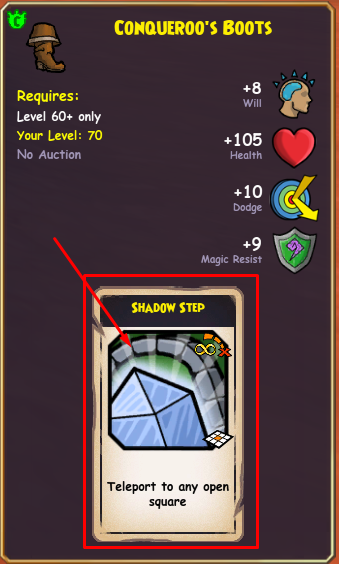
It remains also a great wonder that previous generals have neglected the ability to move anywhere on the map they choose with the aid of shadow step which witch doctors already have trained, and can also be obtained from such items as the black rain shades, and the conquerors boots. These abilities have been in the game ever since Marleybone was released, yet because of how uncreative most generals are, this has not been utilized until recent times.
Your Strategy Must Not have too Many Contingencies, Always have double factors, and several back up plans ready.
When people rely on the “perfect” positioning and or on such abilities as highland charge, black fog, purge, and or group curse. Such strategies may work against those teams which are incompetend, but against any capable team, relying on such strategies will be sure to backfire.
Here is an example of such a strategy that has too many contingencies: The Friar Sand Charge.
Swashbuckler’s Make Horrible Early Game Damage Carries.
Musketeers and musketeer companions being the staple of PvP, swashbuckler always lack the reactionary epics and chaining potential available to other classes. It also is the most fragile class requiring two valor fortresses among other protections just to stay alive for more than a few turns, yet many PvP teams have put their swashbuckler last on the sigil which is the spot that is best to put the main damage carry. It will be thought narrow minded for me to criticize a common playstyle, but the teams that utilize this style have consistently lost vs teams that are competent and have the damage carry slot reserved for a musketeer, so I feel my opinion is justified.
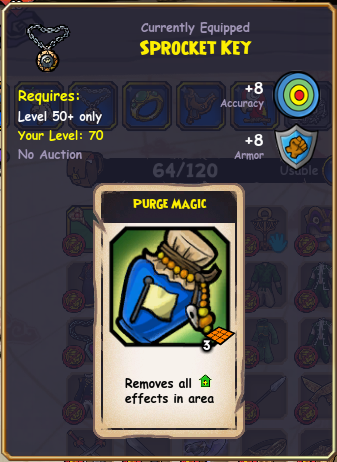
The Effectiveness of Purge Magic, and Surge of Technomancy.
Purge magic is an ability that removes all positive buffs except for hides in a 3x3 area when used. This is a great way to get rid of the shields on a damage carry juggernaut that gets to close. That is its primary use.
It remains a great wonder why people frequently equip the damage carry on with purge magic when it is only 1v1 effective.
What do I mean by this. Well, if that damage carry, being the last person on the team to take their turn, purges, only their 3 companions will be able to utilize this advantage. The second spot on the sigil will be 2v2 effective, and the first spot will be 3v3 effect. This is because more units will be available to take advantage of purge when the 1st and 2nd teammates use it.
Surge of technomancy uses the same principles of effectiveness, but it is a power that works much differently than “Purge Magic” in that it does not remove everyone’s buffs in a 3x3, but instead it can be used to target one unit and remove the first buff that was put onto the unit. This power is especially useful in 1v1s where you, oftentimes, don’t have a support constantly through on buffs for you. It’s best to use this power in the late game for removing “valor fortresses”.
The Offensive Use of Slows to Prevent Counter Charges:
It’s obvious how slows may be used defensively to prevent an immediate charge, but what few people seem to realize is the offensive use of these powers.
First of all you can obtain these abilities either as a witchdoctor with the ability widows touch, or you can make use of the maelstrom power from the companions exeter or emmett. Emmett can only be obtained by privateers, but exeter may be purchased in the crown shop by all classes for the equivalent of $10 in crowns. It is better to use the slows from these companions than from the witch doctor because the witch should be moving down the field instead of staying stationary.
So how do you use these abilities offensively. It’s simple, move up with your damage carry and companions while slowing your opponent. This stifles their chance at a coordinated counter charge, and thus makes it so that your support doesn’t have to spend as many turns protecting the damage carry and can instead apply more team buffs.
Quad Screening will train you to manage your time well, not panic, coordinate your attacks, and not rely on your team/blame them for everything.
You may think this tip is a bit excessive, but I can say from my own experience that those that can quad well are also some of the top 1v1 players in this game, they also work better with teams contrary to the common belief.
Roman Legionnaires would train with a sword that was twice as heavy than the one they used in combat and the same concept also applies here. Yes, you might be worse off quad screening in serious PvP matches at first, but it will make you a better player.
There are other benefits of quad screening which I have written about at length elsewhere:
Quad Boxing and How it Benefits a Player, his Wallet, and the Community
Communication is key.
You can see what your teammates are going to by holding your mouse over them and their companions. Use this technique and make moves that compliment what your teammates are doing. I also advise joining a discord call while you’re in a match because the stronger your communication is, the more likely you are to win.
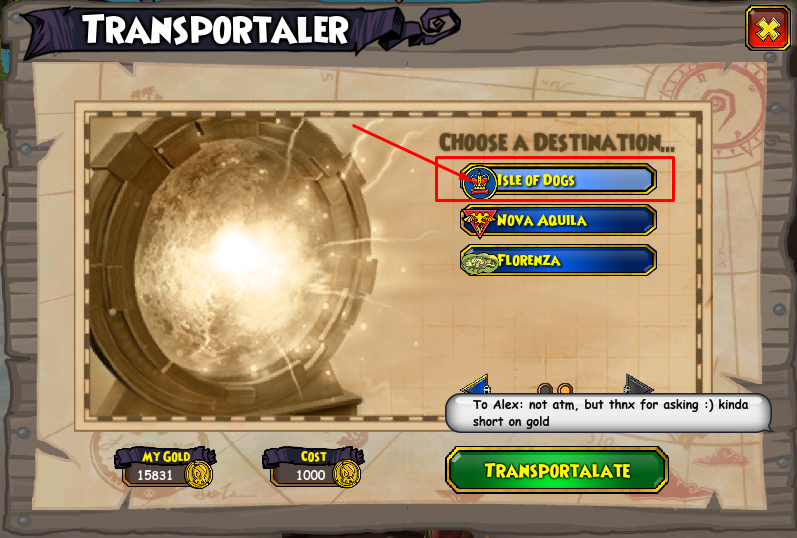
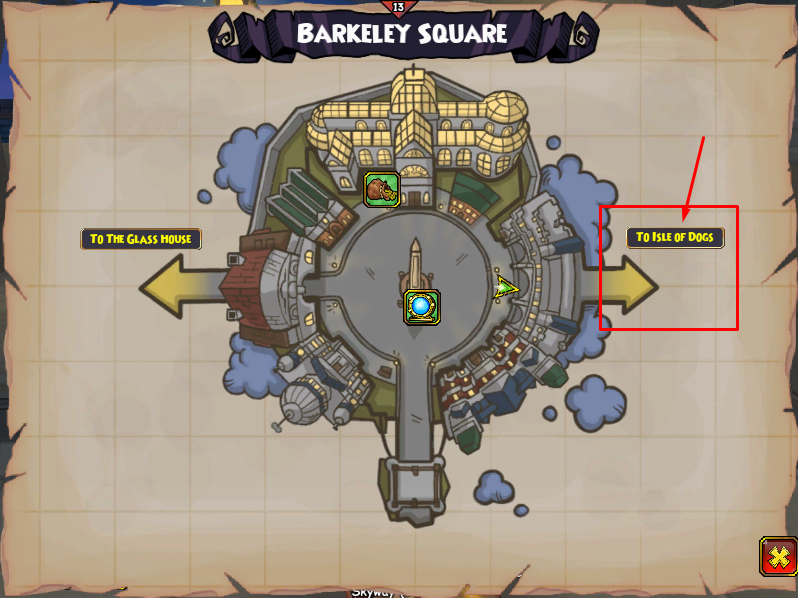
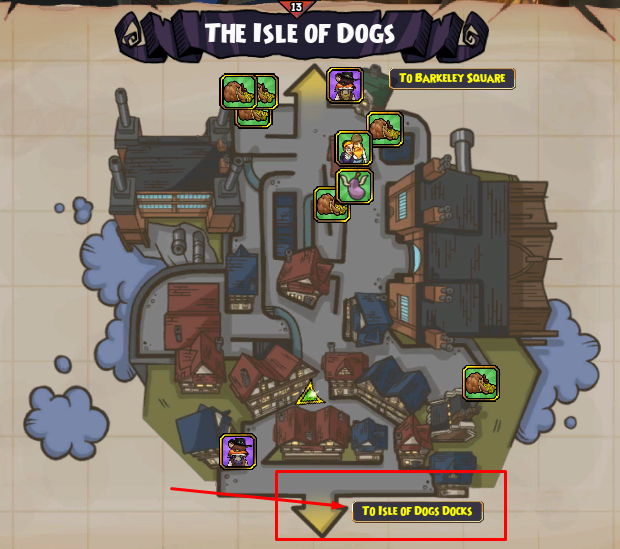
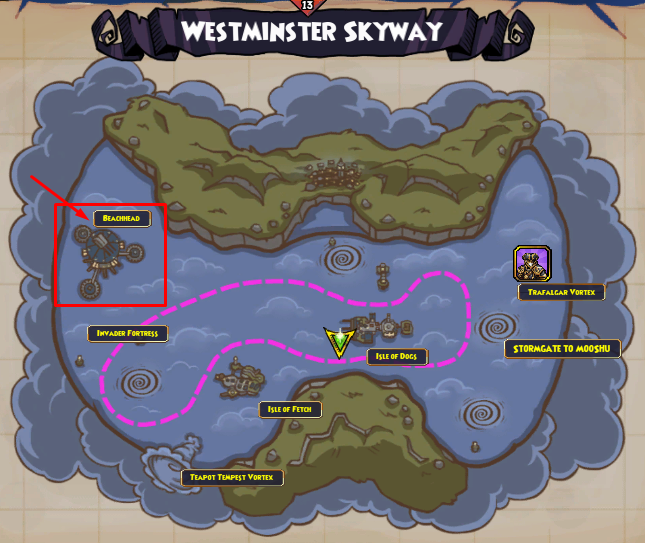
Random Tips for Random Places:
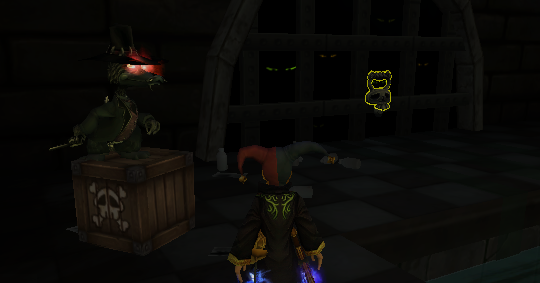
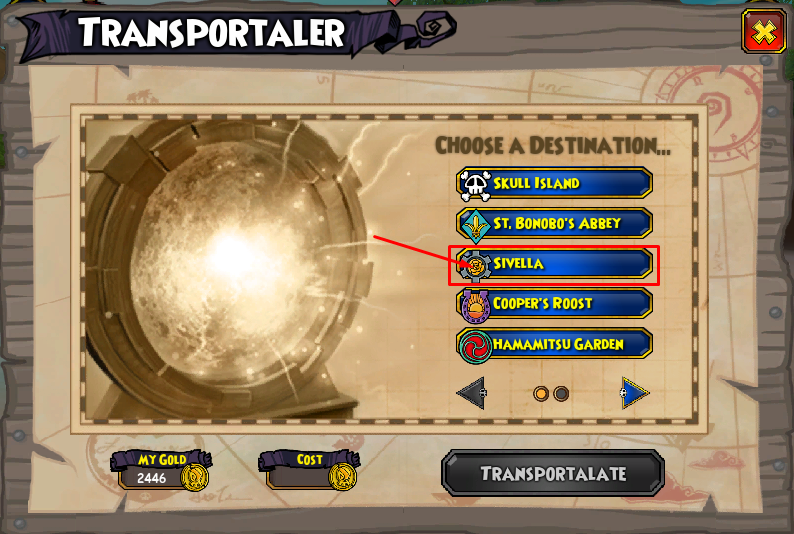
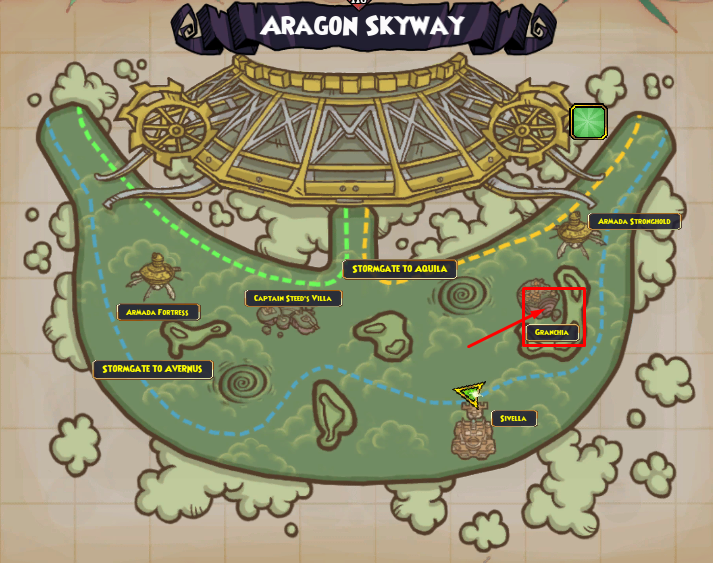
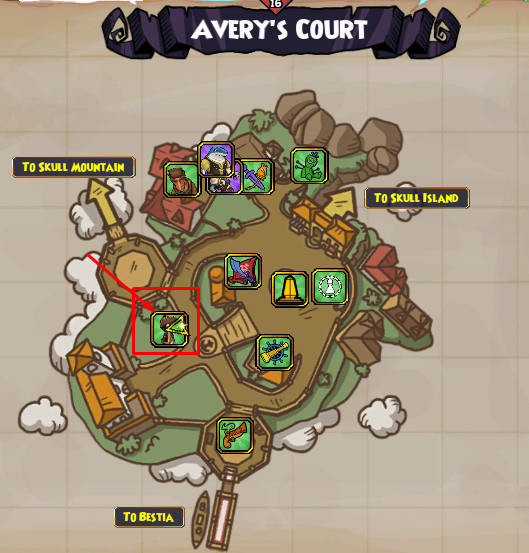
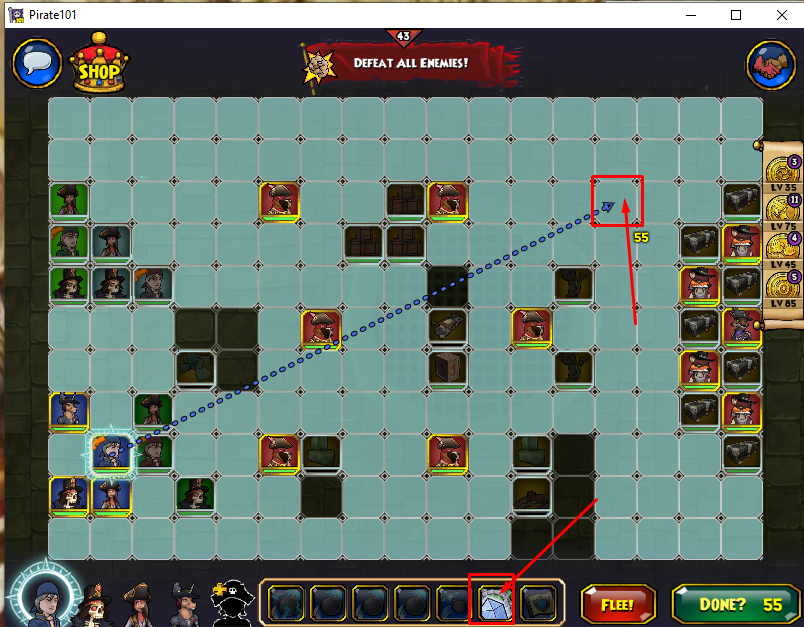
Farming Black Bonnie Anne
is a special boss that requires the use of teleports to farm efficiently. I suggest equipping Black Rain Shades, and Conqueroo’s Boots, so that you can teleport down the field, so that you will be outside of the bomb spam from Fox Radicals while also obtaining range of them and Black Bonnie herself at the same time.
Here’s the Conqueroo’s Boots.

Here are the Black Rain Shades:


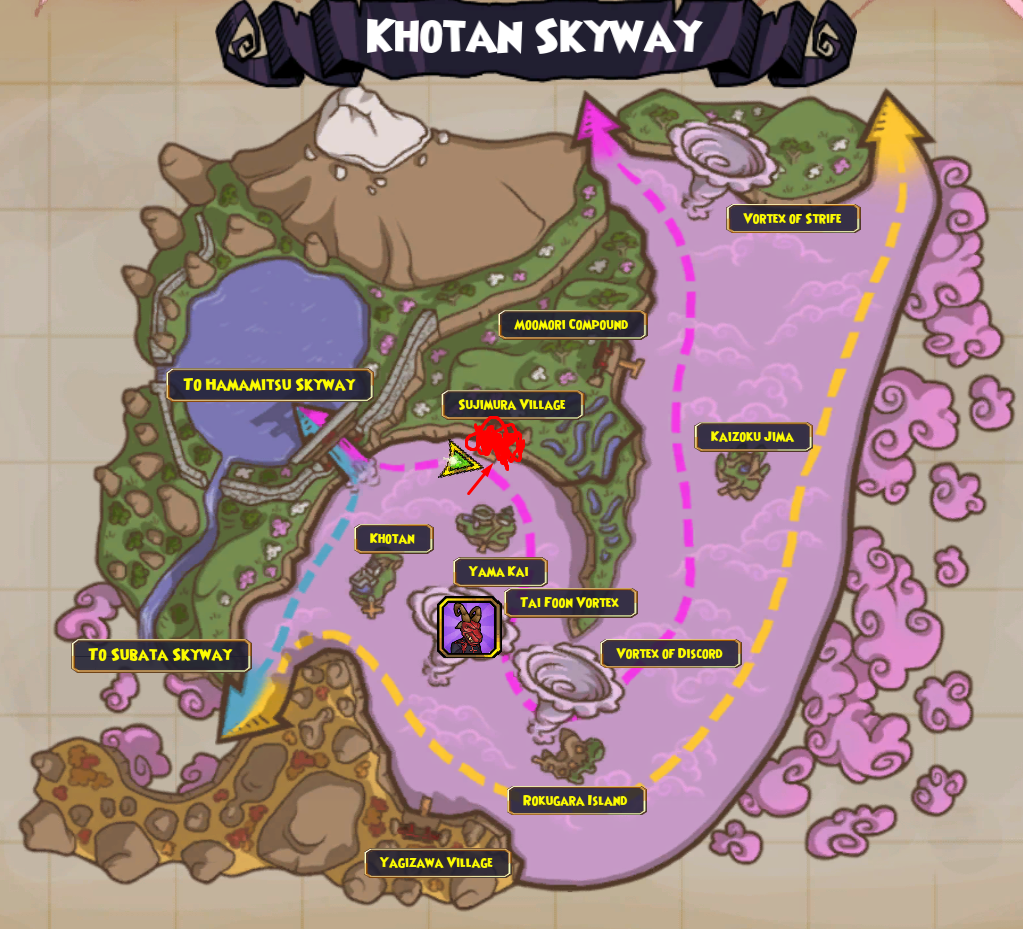
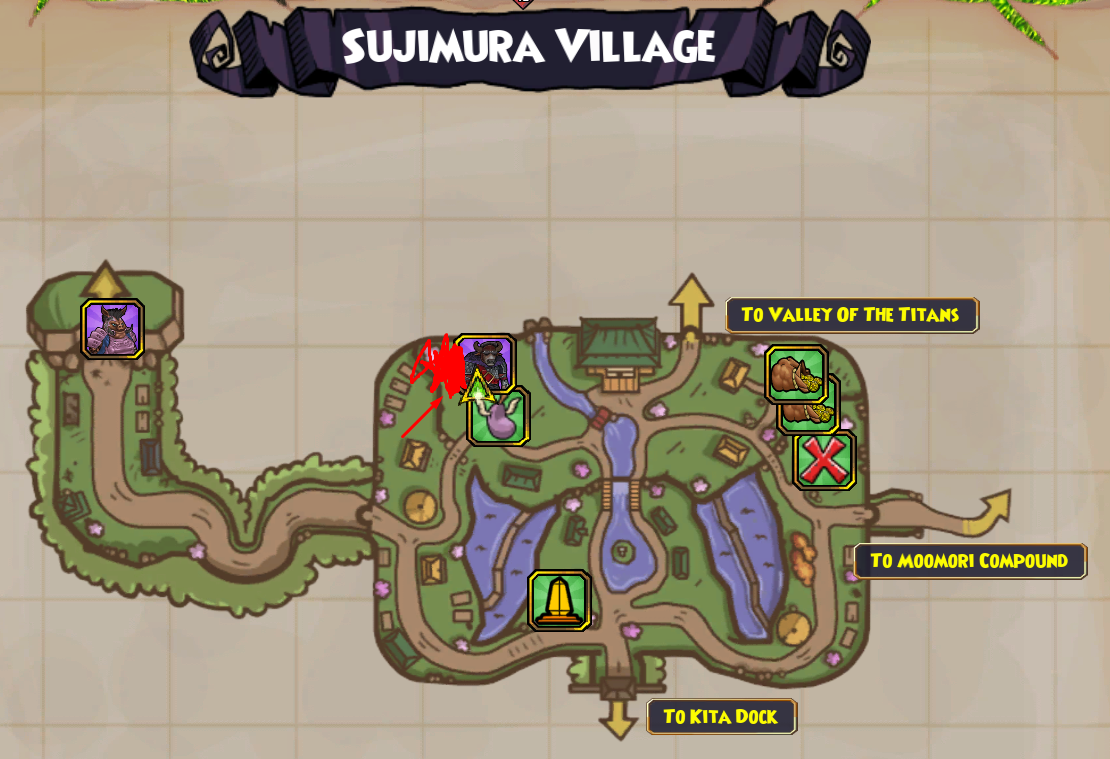
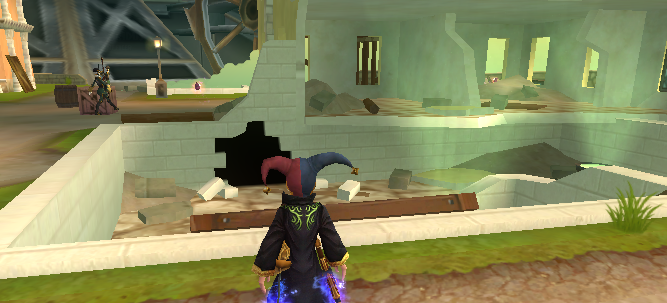
Shadow Step in Action
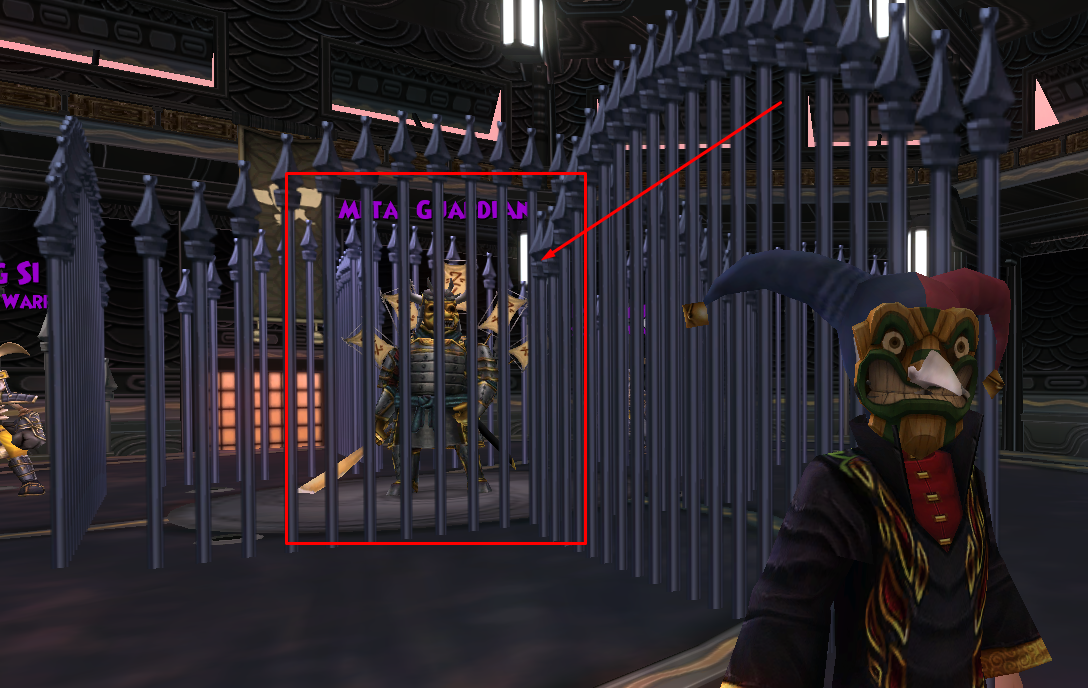
Farming Metal Guardian:
Another exception to the rule is with the meta guardian who is best farmed with a swashbuckler, El Toro, Goronado, and Fan Flanders because all of them can jump which means you can solve the puzzle faster and beat the metal guard faster than you could with any other setups.


Postlogue
Set lofty goals and try hard at everything in life (including your games) because if you’re going to think you might as well think big.
The End